Secrets to Wireworking Video 7: Custom Ear Wires Earrings with Crystal Passions® and Wirework

Add an extra touch of style with custom earwires--the featured technique of our next wirework series project. Patti shows you how to use loops to create this cascading pair of crystal chandelier earrings. Plus, you'll learn how to add an eye-catching hammered finish to the wire loops!

Hover over to zoom.
Design Idea MH29
-- Designer --
Patti, Jewelry Designer, Exclusively for Fire Mountain Gems and Beads®
To learn more about Patti Miller, read her jewelry artist success story here.
: : : Materials : : :
Click here to view a full list of materials used in this design.
Please take the creative opportunity to select the products of your choice for this design, offered here at Fire Mountain Gems and Beads. Some materials may not be available or listed.
- Bead, antique silver-plated "pewter" (zinc-based alloy), 4x1mm beaded rondelle
- Bead, Crystal Passions®, light turquoise glacier blue, 4mm bicone (5328)
- Bead, Crystal Passions®, light turquoise, 8x6mm faceted rondelle (5040)
- Bead, TierraCast®, antique silver-plated pewter (tin-based alloy), 3x1mm beaded rondelle
- Drop, Crystal Passions® crystals, Crystal Passions®, light turquoise glacier blue, 11x5.5mm faceted briolette pendant (6010)
- Drop, Crystal Passions® crystals, Crystal Passions®, light turquoise glacier blue, 13x6.5mm faceted briolette pendant (6010)
- Jump ring, clear-coated copper, 5x4.5mm oval, 3.8x3.2mm inside diameter, 22 gauge
- Wire, ParaWire™, copper, round, 20 gauge
- Chasing hammer, steel and rubberwood, natural, 28mm convex head and 14mm ball head, 10 inches
- Pliers, Wubbers® Designer Mandrel, jumbo round mandrel, steel and rubber, 7 inches
Instructions
Step 1
Cut the following lengths of wire:
- Two 10-inch
- Two 8-inch
- Two 4-inch
- Four 2-inch
Creating the Ear Wire
Step 2
Make a simple loop on one end of one 4-inch length of wire. Adjust so the loop is centered at the end of the wire.
Step 3
String onto the wire a 3mm rondelle and a crystal bicone. Bend the wire away from the bicone at an approximately 80-degree angle.
Step 4
Grip the wire at the point of the bend and wrap once around the smaller barrel of Wubbers® pliers to make a perfect circle. Cut off excess wire beyond the circle with flush-cutter pliers.
Step 5
Use chain-nose pliers to straighten out the end of the wire and make a slight bend away from the circle, approximately 1/4 inch from the end of the wire.
Step 6
Use medium-grit sandpaper to smooth out the edges.
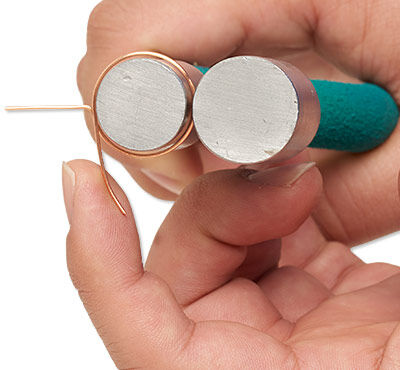
Place the circular portion of the ear wire on a steel block and gently use the domed surface of a hammer to flatten the wire.
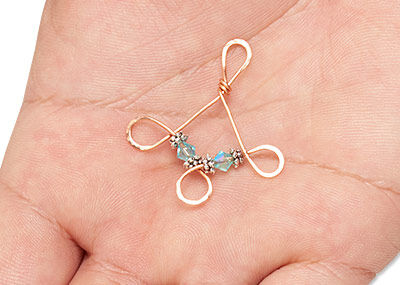
Creating the Top Chandelier Component
Step 7
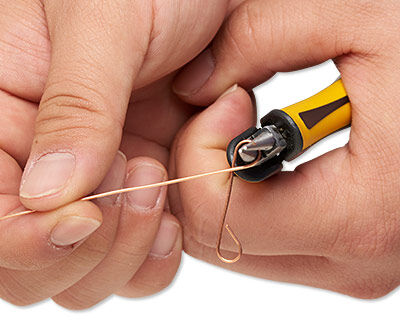
Place the large end of round-nose pliers approximately 2mm from the end of a 10-inch length of wire. Wrap the wire around the barrel of pliers to make a teardrop-shaped loop, stopping just short of making a complete loop.
Approximately 2-3 inches further down the wire, make another teardrop-shaped loop.
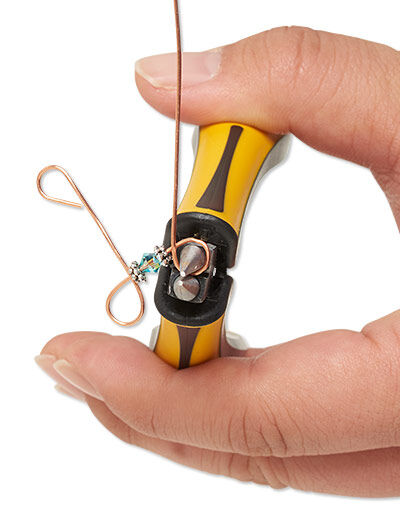
Step 8
String onto the wire a 3mm rondelle, a 4mm rondelle, a crystal bicone, a 4mm rondelle and a 3mm rondelle.
Step 9
Make a round loop, letting the tail of the wire rest at approximately a 100-degree upward angle.
Step 10
Repeat Step 8.
Step 11
Make another teardrop loop, similar to Step 7. Let the tail of the wire rest upward toward the first teardrop loop.
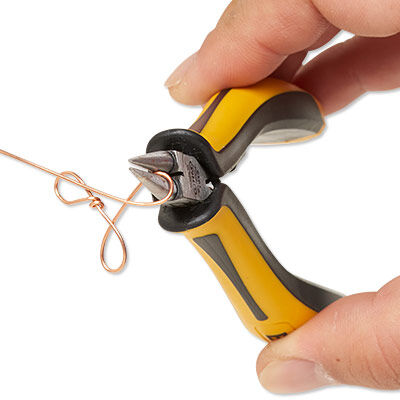
Step 12
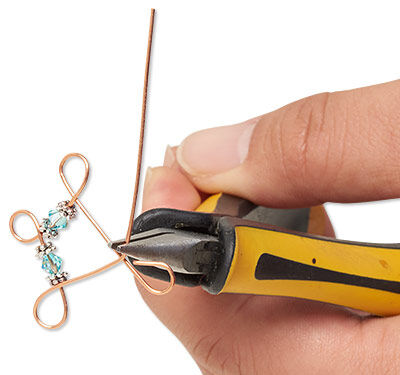
At a point approximately 2-3mm below the first teardrop loop, make a bend in the wire.
Step 13
Wrap the tail of the wire twice around the base of the first teardrop loop. Trim excess wire.
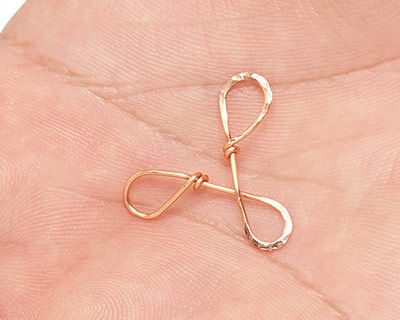
Place each loop on a steel block with the cut ends of wire facing downward. Be sure to keep wrapped wire and any point that wire crosses over itself off the block.
Use the domed surface of a hammer to flatten out the loops then use the ball end to texturize as desired.
Step 14
Use a jump ring to attach an 11mm crystal briolette to the middle bottom loop of the component.
Creating the Bottom Chandelier Component
Step 15
Clasp the center of an 8-inch length of wire with the bottom of the barrel of round-nose pliers. Bend both sides inward to form a teardrop loop with tails of wire trailing off at an approximately 80-degree angle between them.
Step 16
Approximately 3/4 inch from the teardrop loop, form a second teardrop loop with one side of the wire. Wrap the tail around the base twice. Repeat on the other side.
Place each loop on a steel block with the cut ends of wire facing downward. Be sure to keep wrapped wire and any point that wire crosses over itself off the block.
Use the domed surface of a hammer to flatten out the loops then use the ball end to texturize as desired.
Step 17
Use jump rings to attach an 11mm crystal briolette to each side loop and a 13mm crystal briolette to the center loop.
Creating Link Components
Step 18
Form a simple loop on one end of a 2-inch length of wire.
Step 19
String the following onto the wire:
- One 3mm rondelle
- One crystal bicone
- One 3mm rondelle
- One 4mm rondelle
- One 8mm crystal rondelle
- One 4mm rondelle
Form a simple loop then trim any excess wire.
Repeat to create a second link.
Assembly
Step 20
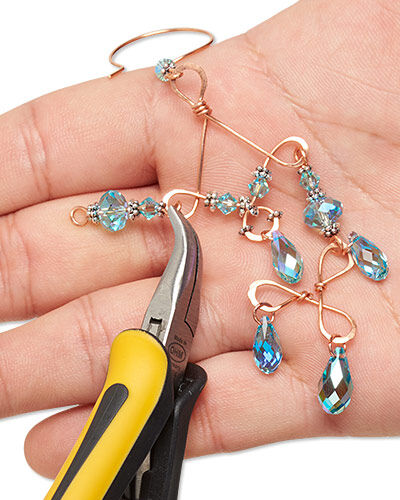
Attach the 3mm rondelle end of one link to one side of the top component. Attach the crystal rondelle end of the same link to one side of the bottom component.
Repeat on the opposite side.
Attach the ear wire to the top loop, being sure the hammered surface faces forward.
Step 21
Repeat Steps 2 - 20 to create a second earring.
Have a question regarding this project? Email Customer Service.
Copyright Permissions
The pieces featured in the Gallery of Designs are copyrighted designs and are provided for inspiration only. We encourage you to substitute different colors, products and techniques to make the design your own.
All works of authorship (articles, videos, tutorials and other creative works) are from the Fire Mountain Gems and Beads® Collection, and permission to copy is granted for non-commercial educational purposes only. All other reproduction requires written permission. For more information, please email copyrightpermission@firemtn.com.