Secrets to Seed Beading Video 3: Tubular Netting Stitch Bottle Necklace Single-Strand Necklace with Seed Beads, Gemstone Beads and Leatherette Bolo Cord

The third project in our Secrets to Seed Beading series builds on the quilling technique from episode 1 and adds tubular netting stitch to create this fun keepsake bottle necklace! Learn how to create a beaded net to hold a tiny glass bottle then fill it up with gemstones, mementos, medicines or anything else! Not big on jewelry? This project would also make a great rearview mirror charm.

Hover over to zoom.
Design Idea NA29
-- Designer --
Rose, Jewelry Designer, Exclusively for Fire Mountain Gems and Beads®
To learn more about Rose Wingenbach, read her jewelry artist success story here.
: : : Materials : : :
Click here to view a full list of materials used in this design.
Please take the creative opportunity to select the products of your choice for this design, offered here at Fire Mountain Gems and Beads. Some materials may not be available or listed.
- Seed bead, Delica®, glass, Duracoat® opaque galvanized yellow gold, (DB1833), #11 round
- Seed bead, Delica®, glass, opaque rainbow black, (DB0005), #11 round
- Crimp end, JBB Findings, antiqued brass, 8.5x6mm tube with swivel, loop and rope trim design, 3mm inside diameter
- Jump ring, antique gold-plated brass, 5.5mm round, 3.5mm inside diameter, 18 gauge
- Clasp, lobster claw, antique gold-plated brass, 11.5x8mm
- Seed bead, TOHO BEADS®, glass, opaque metallic rainbow iris, (TR-11-86), #11 round
- Seed bead, TOHO BEADS®, glass, opaque antique bronze, (TR-11-223), #11 round.
- Bead, Preciosa Pip™, Czech pressed glass, opaque light gold, 7x5mm top-drilled pip
- Component, antique gold-plated steel, 12x10mm double-sided hammered flat oval
- Bead, quartz crystal (natural), extra-large top-drilled Hawaiian chip, Mohs hardness 7
- Inlay chip, amethyst (natural), mini undrilled chip, Mohs hardness 7
- Bead, rose quartz (dyed), medium chip, Mohs hardness 7
- Bead, rhodonite (natural), medium chip, Mohs hardness 5-1/2 to 6-1/2
- Thread, Berkley® FireLine®, gel-spun polyethylene, smoke, 0.13mm diameter 4-fiber braid, 4-pound test
- Component, glass and cork, clear, 38x19mm-40x22mm bottle with stopper and 12mm opening
- Bead, turquoise (dyed / stabilized), blue-green, small to medium pebble, Mohs hardness 5 to 6
- Bolo cord, leatherette, black, 3.5-4mm textured round
Instructions
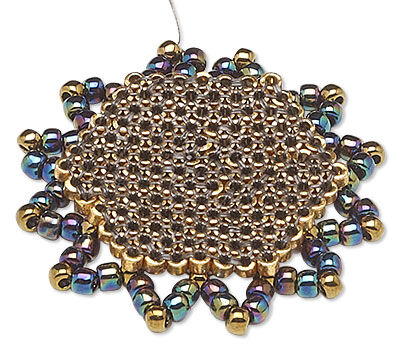
Base - Quilling
Step 1
Thread a beading needle onto an arm-length of FireLine® thread.
Step 2
Leaving a tail, use ladder stitch to create a single row of seven yellow gold #11 Delicas.
Note: For more details, view the Ladder Stitch how-to video.
Step 3
Coil the ladder-stitched beads so six surround one. Pass through the last bead and the bead twice to close the circle.
Pass through an outer bead and the center bead twice. Repeat to secure each of the outer beads to the center bead.
Step 4
Using the same technique, add another row of yellow gold #11 Delicas around the previous row. Continue to add rows until each side of the hexagon base has seven beads, a total of seven rows.
Tie a small knot then weave through adjacent beads to exit a corner bead.
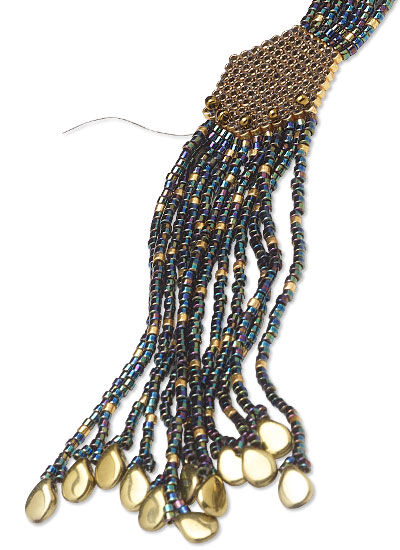
Fringe
Step 5
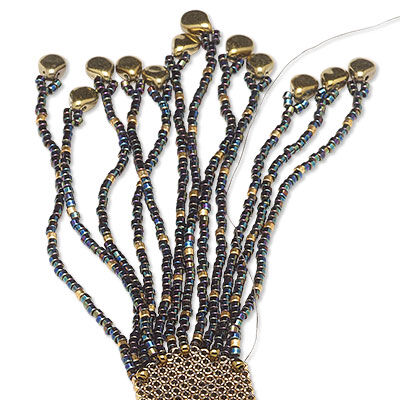
Pick up 2 to 2 1/2 inches of #11 Delicas, one Pip and two #11 Delicas. Skipping the last four seed beads and the Pip, pass back through the strung seed beads and the base bead exited from. Pass through the next edge base bead. Repeat to add fringe all the way around the base.
Tie a small knot then pass through beads to exit opposite the fringe on the corner of the base.
Tubular Netting
Step 6
Pick up an antiqued bronze #11 Toho, skip the next edge base bead, pass through the next. Pull tight to sit the bead over the skipped edge bead. Pass through the next edge bead.
Pick up an antiqued bronze #11 Toho, skip the next edge base bead, pass through the next. Pull tight to sit the bead over the skipped edge bead. Pass through the next edge bead.
Step 7
Pass through the first Toho added to the top of the base. Pick up two rainbow iris Toho, two antique bronze and two rainbow iris. Pass through the next edge Toho. Repeat to complete the first row around the base.
Pass through the first two rainbow and the first bronze of the row to "step up" to the next row.
Step 8
Use the same technique as Step 7 to add rows 2 - 13 with the pick-up the beads listed below. Pass through the antique bronze bead of the previous row after each pick up.
Rows 2, 3, 5, 6, 8, 9, 11, 12: one rainbow, one bronze, one rainbow.
Rows 4, 7, 10, 13: two rainbow, one bronze, two rainbow.
Step 9
Pick up two iris rainbow and pass through the next bronze of the previous row. Repeat to go all the way around the neck of the bottle. Pull to tighten and then tie a small knot to secure.
Step 10

Pick up 25 iris rainbow, one bronze and 25 iris rainbow. Skip the next bronze bead of the last row and pass through the next. Repeat to create six large loops of seed beads.
Pass back through the beads to exit out one of the center bronze of the loops.
Step 11
Pass through all the center bronze beads of the loops then pass through again. Pull tight to create a circle, the first row of tubular peyote.
Pick up one bronze, skip the next of the previous row, then pass through the next. Repeat to add beads all around the new row. Repeat to add a third row.
Step 12
Pick up six iris rainbow then pass through two hammered loops and a bronze bead on the opposite side of the peyote stitch. Pass through all the beads again twice. Tie a small knot and trim any excess thread.
Assembly
Step 13
Insert the end of a bolo cord into a cord end and crimp. Repeat on the opposite end of the cord. String the bottle pendant onto the cord.
Step 14
Use a 5.5mm jump ring to add a lobster claw clasp to one end of the necklace.
Have a question regarding this project? Email Customer Service.
Copyright Permissions
The pieces featured in the Gallery of Designs are copyrighted designs and are provided for inspiration only. We encourage you to substitute different colors, products and techniques to make the design your own.
All works of authorship (articles, videos, tutorials and other creative works) are from the Fire Mountain Gems and Beads® Collection, and permission to copy is granted for non-commercial educational purposes only. All other reproduction requires written permission. For more information, please email copyrightpermission@firemtn.com.