Secrets to Seed Beading Video 10: Back Stitch, Couching, Edging Necklace Single-Strand Necklace with Seed Beads, Dichroic Glass Cabochons and Preciosa Czech Crystal Beads

It's time for the final project in our 10-part Secrets to Seed Beading series! For the grand finale, Rose shows you how to combine all the techniques you've learned and combine them with three more to create a colorful cabochon necklace. Thank you for joining us and happy seed beading!

Hover over to zoom.
Design Idea NA2B
-- Designer --
Rose, Jewelry Designer, Exclusively for Fire Mountain Gems and Beads®
To learn more about Rose Wingenbach, read her jewelry artist success story here.
: : : Materials : : :
Click here to view a full list of materials used in this design.
Please take the creative opportunity to select the products of your choice for this design, offered here at Fire Mountain Gems and Beads. Some materials may not be available or listed.
- Seed bead, Delica®, glass, Duracoat® opaque galvanized dark berry, (DB1842), #11 round
- Seed bead, Delica®, glass, Duracoat® opaque galvanized zest, (DB1835), #11 round
- Seed bead, Delica®, glass, translucent silver-lined semi-matte green, (DB0688), #11 round
- Seed bead, Delica®, glass, transparent silver-lined cobalt, (DB0047), #11 round
- Clasp, magnetic, gold-plated brass, 10mm corrugated round
- Bead, Preciosa Czech crystal, hyacinth, 3mm faceted bicone
- Cone, gold-finished brass, 21x7mm smooth with 6mm inside diameter
- Seed bead, Miyuki, glass, Duracoat® transparent silver-lined dusty red, (RR4270), #15 rocaille
- Needle, Tulip, nickel- and gold-plated steel, #11 with 0.52mm eye width, 2 inches
- Adhesive, E6000® Fray Lock™, crystal clear
- Cupchain, glass rhinestone and silver-plated brass, clear, 2mm round
- Thread, Berkley® FireLine®, gel-spun polyethylene, smoke, 0.13mm diameter 4-fiber braid, 4-pound test
- Seed bead, Miyuki, glass, transparent silver-lined cobalt, (RR20), #15 rocaille
- Seed bead, Miyuki, glass, transparent silver-lined green, (RR16), #15 rocaille
- Cabochon, dichroic glass, orange and multicolored, 12mm and 30mm non-calibrated round
- Head pin, gold-plated brass, 3 inches, 21 gauge
- Lacy's Stiff Stuff™, beading foundation, white, 11x8-1/2 inch sheet
- Scrap, leather (dyed), purple, 9-1/4 x 3-1/2 inch square
- Jump ring, gold-plated brass, 4mm round, 2.4mm inside diameter, 20 gauge
Instructions
Spiral Rope
Step 1
Add a beading needle to an arm-length of thread. Leaving an 8-inch tail, add a stop bead.
Step 2
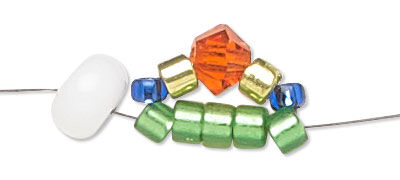
Pick up the following:
- Five green #11 seed beads
- One cobalt #11 seed bead
- One galvanized zest #11 seed bead
- One tangerine bicone
- One zest
- One cobalt #11
Pass through the green seed beads again.
Step 3
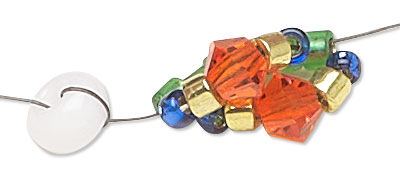
Pick up the following:
- One green #11
- One cobalt #11
- One zest
- One bicone
- One zest
- One cobalt
Pass through the last five green #11s again.
Repeat to create a beaded rope approximately 7 inches long.
Step 4
Cut the head off a head pin then create a wrapped loop. Tightly stitch the working thread of the beaded rope to the wrapped loop, then tie a small knot and trim.
String a cone over the wire then create a wrapped loop.
Step 5
Repeat Steps 1 - 4 to create a second beaded rope.
Backing Preparation
Step 6
Cut a 3-inch square and two 1 1/2 inch squares of Lacy’s Stiff Stuff. Color the backing with black acrylic paint or permanent marker.
Step 7
Add a small amount of adhesive to the back of a 30mm cabochon then press into the center of the 3-inch square of backing. Repeat to add 12mm cabochons to the smaller squares.
Step 8
Add a sharp needle to an arm-length of thread. Tie a knot approximately four inches from the end of the thread.
Large Embroidered Focal
Step 9
Pass up through the backing, exiting at the edge of the cabochon.
Step 10
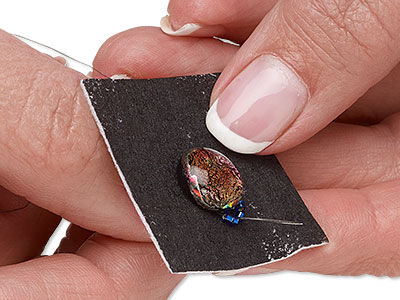
Pick up four cobalt #11s. Lay the beads along the edge of the cabochon then pass down through the backing.
Pass up through the backing between the second and third beads. Pass through the third and fourth beads.
Repeat to backstitch around the entire cabochon.
Note: Surround the cabochon with an even number of beads to create the base of a peyote-stitch bezel.
Step 11
Use the tubular peyote technique to add the following rows around the cabochon:
- Two rows of cobalt #11
- Two rows of green #11
- Two rows of dusty red #15
Step 12
Pick up a dusty red #15 then pass through the next two dusty red of the previous row. Repeat to add a spaced row all the way around.
Step 13
Pass through various beads to exit at the base of the beaded bezel then pass down through the backing.
Step 14
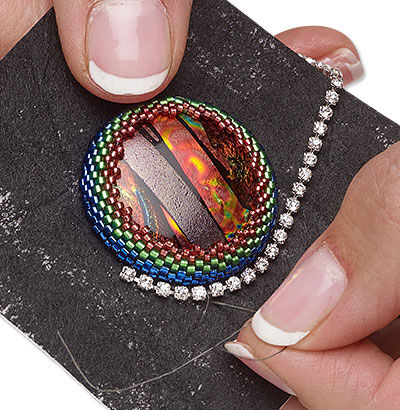
Cut a length of cupchain to encircle the base of the bezel. Hold the cupchain in place at the edge of the bezel.
Pass up through the backing, over the chain between two cups, and back through the backing. Repeat the couching stitch along the length of cupchain to secure it around the beaded bezel.
Step 15
Pass up through the backing and pick up four cobalt #15 seed beads. Pass over the chain between two cups (over the thread previously stitched) and back through the backing. Repeat to embellish the couching stitch along the length of cupchain.
Step 16
Use backstitch to add the following concentric rows:
- One row of galvanized dark berry #11
- One row of zest #11
- One row of green #11
Secure the thread with a knot on the bottom of the backing and then trim.
Small Embroidered Focals
Step 17
Use backstitch and cobalt #11s to encircle the 12mm cabochon.
Step 18
Use the tubular peyote technique to add the following rows:
- Two rows of cobalt #11
- One row of green #11
- One row of dusty red #15
- One spaced row of dusty red #15
Step 19
Pass through various beads to exit the base row of the beaded bezel then use backstitch to add the following concentric rows:
- One row of galvanized dark berry #11
- One row of zest #11
- One row of green #11
Step 20
Secure the thread with a knot on the bottom of the backing and then trim.
Beaded Edging
Step 21
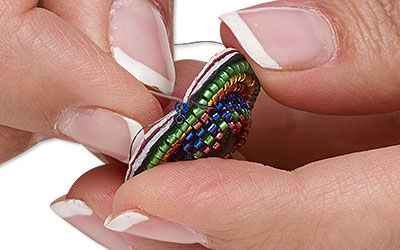
Trim the backing of the large focal 3mm from the beads.
Prepare a new length of thread with a sharp needle and a knot. Pass up through the backing, exiting just outside the beading.
Step 22
Avoiding the outer 1/4 inch of both materials, glue a piece of leather to the back of the backing on each focal. Once the glue has dried, trim the leather and backing to 1mm from the beading.
Step 23
Pick up two cobalt #11 then bring the needle to the back of the piece.
Pass through near the edge of the leather and backing.
Pass through the second cobalt added and pull tight.
Step 24
Pick up one cobalt #11 then bring the needle to the back of the piece.
Pass through near the edge of the leather and backing, approximately one bead width from the previous stitch.
Pass through the picked-up bead again and pull tight.
Repeat to add a brick-stitch edging around the entire focal.
Add another stitch without adding a new bead, instead passing through the first bead to secure it.
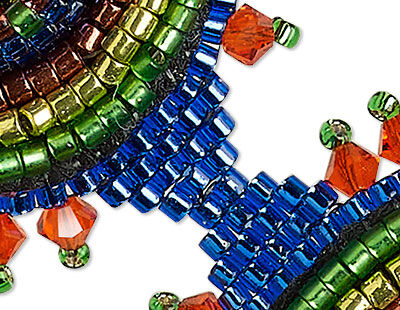
Step 25
Add a row of brick stitch off the edging, 5 beads wide. Continue to add rows, decreasing to the last row of 2 beads.
Pass in and out through edge beads to exit out an edge bead adjacent to the triangle.
Step 26
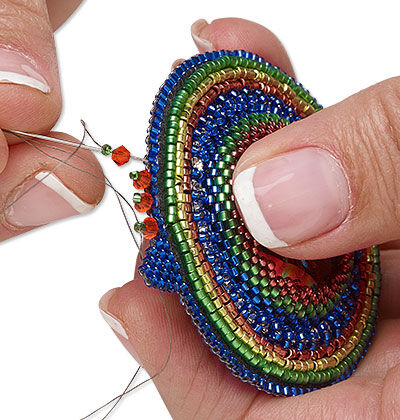
Pick up a bicone and a green #15. Pass back through the bicone and the next edge bead then pull tight. Repeat to add 11 pieces of fringe.
Step 27
Repeat Step 25 to add a second brick-stitch triangle, then add fringe around the rest of the focal.
Step 28
Repeat Steps 21 - 24 to add a brick-stitch edging to a small focal.
Step 29
Add a row of brick stitch off the edging, six beads wide. Continue to add rows, decreasing to the last row of 3 beads.
Step 30
Tightly stitch the last row to the last row of a triangle on the large focal.
Step 31
Pass through various beads to exit the edge bead directly next to the brick-stitch triangle. Repeat Step 26 to add fringe to the small focal.
Step 32
Repeat Steps 28 - 31 to complete the second small focal.
Assembly
Step 33
Remove the stop bead from the tail of one beaded rope then add a beading needle. Tightly stitch the end of the beaded rope to the edge of a small focal, directly opposite the brick-stitch triangle. Tie a small knot to secure then trim.
Repeat to complete the other half of the necklace.
Step 34
Use jump rings to add a clasp to the ends of the necklace.
Have a question regarding this project? Email Customer Service.
Copyright Permissions
The pieces featured in the Gallery of Designs are copyrighted designs and are provided for inspiration only. We encourage you to substitute different colors, products and techniques to make the design your own.
All works of authorship (articles, videos, tutorials and other creative works) are from the Fire Mountain Gems and Beads® Collection, and permission to copy is granted for non-commercial educational purposes only. All other reproduction requires written permission. For more information, please email copyrightpermission@firemtn.com.