Secrets to Seed Beading Video 9: Peyote, Chenille, Picot Edge Necklace Single-Strand Necklace with Delica® and Miyuki Seed Beads, Cat's Eye Glass Cabochon and Horn Component

Our Secrets to Seed Beading series is nearing its end and the 9th project is bringing several essential skills together. Follow Rose as she shows you how to create a bezel for a cabochon using peyote stitch and then combine it with other techniques to form this elegant 80s-style necklace.


Hover over to zoom.
Design Idea NA2A
Bended Horn
-- Designer --
Rose, Jewelry Designer, Exclusively for Fire Mountain Gems and Beads®
To learn more about Rose Wingenbach, read her jewelry artist success story here.
: : : Materials : : :
Click here to view a full list of materials used in this design.
Please take the creative opportunity to select the products of your choice for this design, offered here at Fire Mountain Gems and Beads. Some materials may not be available or listed.
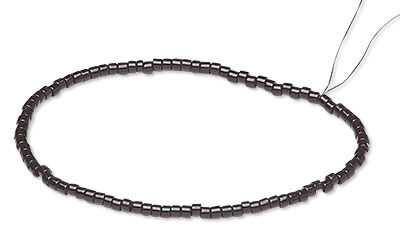
- Seed bead, Delica®, glass, opaque black, (DB0010), #11 round
- Seed bead, Miyuki, glass, opaque black, (RR401), #8 rocaille
- Seed bead, Delica®, glass, opaque black, (DBS0010), #15 round
- Clasp, self-closing hook, gold-plated brass, 14x10mm with (2) 7x6mm oval jump rings
- Cone, gold-finished brass, 12x6mm cone square pattern, 5mm hole
- Seed bead, Miyuki, glass, opaque 24Kt gold-plated, (RR191), #11 rocaille
- Component, horn (dyed), black, 9-10.5mm wide, 3 x 3/4 inch to 3-1/4 x 1 inch undrilled curve with tapered 4-5mm ends
- Cord end, JBB Findings, gold-plated pewter (tin-based alloy), 11mm textured round tube, 9mm inside diameter
- Seed bead, Miyuki, glass, opaque 24Kt gold-plated (RR191), #15 rocaille
- Bead, gold-plated brass, 4x2mm heishi
- Bead, gold-plated brass, 4mm round
- Thread, Berkley® FireLine®, gel-spun polyethylene, smoke, 0.13mm diameter 4-fiber braid, 4-pound test
- Seed bead, Miyuki, glass, opaque black, (RR401), #15 rocaille
- Head pin, silver-plated brass, 3 inches, 21 gauge
- Cabochon, cat's eye glass (fiber optic glass), pink, 40x30mm calibrated oval, quality grade
Instructions
Bezel Instructions
Step 1
Add a beading needle to an arm-length of Fireline thread.
Step 2
Leaving a small tail, pick up 90 black #11 Delicas. Pass through the beads again and pull tight to create a circle. Tie a small knot to secure.
Step 3
Using the tubular peyote stitch technique, add the following:
- One row of black #11 Delicas
- Two rows of black #15 Delicas
- One row of black #15 rocailles
Tip: For more information, view our ''How to make a Tubular Peyote Stitch'' how-to video and illustrated instructions.
Step 4
Pass through various beads to exit out the first row of seed beads.
Step 5
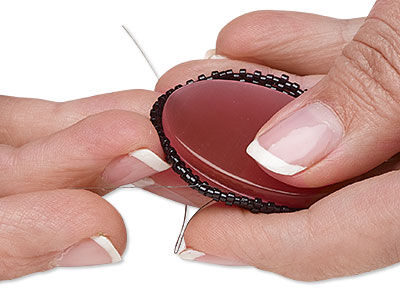
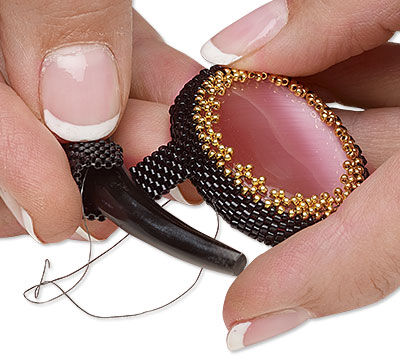
Insert the cabochon with the front toward the #15 rocailles last added as soon as it will stay secure during stitching.
Use the tubular peyote stitch technique to add the following:
- One row of black #11 Delicas
- Three rows of black #15 rocailles
- One row of gold #15 rocailles
Step 6
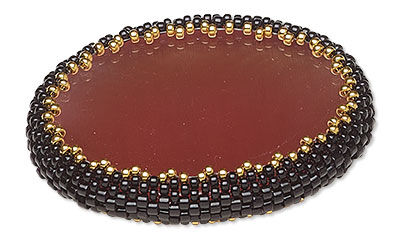
Pick up a gold then pass through the next two gold of the previous row. Repeat to add a spaced row all the way around the back of the bezel.
Step 7
Pass through various beads to exit the last row at the front of the bezel.
Step 8
Using tubular peyote stitch, add one row of gold #15.
Use the technique from Step 6 to add a spaced row of gold.
Step 9
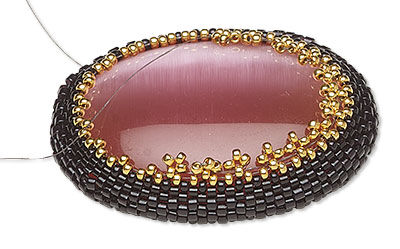
Pass through the first gold added to the previous row. Pick up three gold #15 then pass through the bead of the previous row again. Pull the picot stitch tight. Add a picot stitch to each of the gold #15 added in the last row.
Bail Instructions
Step 10
Pass through various beads to exit out the side of the bezel.
Step 11
Using the peyote stitch technique, add three black #11 Delicas. Repeat to add a total of five rows of peyote stitch.
Tip: For more information, view our ''How to Create an Even and Odd Count Peyote Stitch'' how-to video and illustrated instructions.
Step 12
Continue to add peyote stitch of black #11 Delicas to create a beaded band long enough to wrap around the center of the horn component.
Step 13
Stitch the last row of the beaded back to the sixth row, creating a loop for the horn component.
Step 14
Pass through the beads to exit out the top edge of the loop. Repeat Step 11 to add three rows then Step 12 - 13 to add a second loop.
Step 15
Pass through various beads to exit the opposite side of the beaded bail. Pick up three gold #15, pass through the next edge bead. Exit through the next edge bead.
Continue to add picot stitch to both sides of the bail.
Step 16
Insert the horn component, adding a dab of adhesive for additional security if desired.
Step 17
Use a small amount of adhesive to add cones to the end of the bone component.
Beaded Rope Instructions
Step 18
Add a beading needle to an arm-length of thread.
Step 19
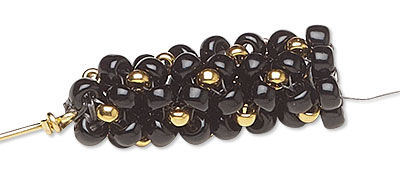
Leaving a tail, use the ladder stitch technique to create a length of six black #8 seed beads.
Stitch the last bead to the first to create a circle.
Tip: For more information, view our ''Ladder Stitch, How-To'' how-to video and illustrated instructions.
Step 20
Use the tubular chenille stitch technique to create a beaded rope.
Tip: For more information, view our ''How to Create the Tubular Chenille Stitch'' illustrated instructions.
Step 21
Add another row, adding only one black in each repetition to taper the end of the beaded rope. Pass through the last row again to secure. Do not trim the thread.
Add a beading needle to the tail thread to taper and secure the opposite end.
Step 22
Cut the head off a head pin then create a wrapped loop.
Tip: For more information, view our ''Making a Wrapped Loop and Double-Wrapped Loop'' how-to video and illustrated instructions.
Step 23
Tightly stitch one end of the beaded rope to the wrapped loop. Tie a knot to secure.
Step 24
String a 4mm heishi, a bead cone and a 4mm round onto the wire then create a wrapped loop.
Step 25
String the bail of the focal onto the beaded rope, then repeat Steps 21 - 24 on the opposite end.
Step 26
Attach the clasp to the end of the necklace.
Have a question regarding this project? Email Customer Service.
Copyright Permissions
The pieces featured in the Gallery of Designs are copyrighted designs and are provided for inspiration only. We encourage you to substitute different colors, products and techniques to make the design your own.
All works of authorship (articles, videos, tutorials and other creative works) are from the Fire Mountain Gems and Beads® Collection, and permission to copy is granted for non-commercial educational purposes only. All other reproduction requires written permission. For more information, please email copyrightpermission@firemtn.com.