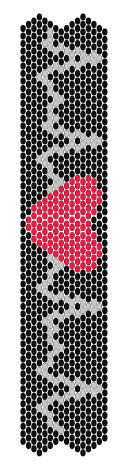
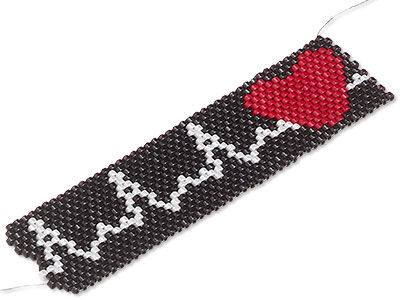
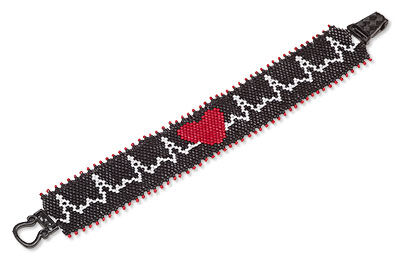
Secrets to Seed Beading Video 5: Even-Count Peyote Stitch Bracelet Bracelet with Delica® and Miyuki Seed Beads

We are halfway through our Secrets to Seed Beading series! In this project, Rose is teaching you even count peyote stitch. This graphic pattern is a great way to learn this versatile and must-know technique. The resulting beaded bracelet is a great addition to your outfit, your jewelry lines or as gift for friends and medical professionals.

Hover over to zoom.
Design Idea NA25
-- Designer --
Rose, Jewelry Designer, Exclusively for Fire Mountain Gems and Beads®
To learn more about Rose Wingenbach, read her jewelry artist success story here.
: : : Materials : : :
Click here to view a full list of materials used in this design.
Please take the creative opportunity to select the products of your choice for this design, offered here at Fire Mountain Gems and Beads. Some materials may not be available or listed.
- Seed bead, Miyuki, glass, opaque black, (RR401), #15 rocaille
- Seed bead, Miyuki, glass, opaque red, (RR408), #15 rocaille
- Thread, Berkley® FireLine®, gel-spun polyethylene, smoke, 0.13mm diameter 4-fiber braid, 4-pound test
- Needle, Tulip, nickel- and gold-plated steel, #11 with 0.52mm eye width, 2 inches
- Clasp mix, magnetic, glass rhinestone and black-finished "pewter", red, 12mm double-sided round and 29x13mm 2-strand fold-over
- Seed bead, Delica®, glass, opaque black, (DB0010), #11 round
- Seed bead, Delica®, glass, opaque luster white pearl, (DB0201), #11 round
- Seed bead, Delica®, glass, opaque semi-matte dyed bright red, (DB0791), #11 round
Instructions
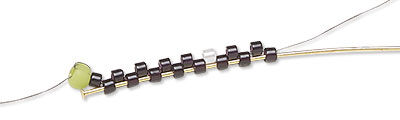
Step 1
Add a beading needle to a 4-foot length of FireLine® thread.
Step 2
Pick up a bead that is not a color used in the pattern. Bring the bead to the end of the thread, leaving a 12-inch tail.
Pass through again and pull the thread tight. Do not use this stop bead when stitching the pattern.
Step 3
Pick up the first bead of Row 1, the first bead of Row 2, the second bead of Row 1, and so on until all the beads of Rows 1 and 2 are on the thread.
Move the beads down the thread to the stop bead.
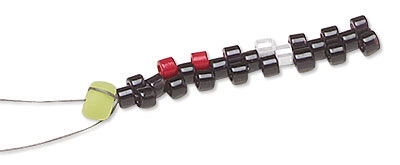
Step 4
Pass a head pin or a piece of wire through every other bead, started with the second bead picked up. Keep the head pin in the beads. The beads on the head pin are Row 1, the others are Row 2.
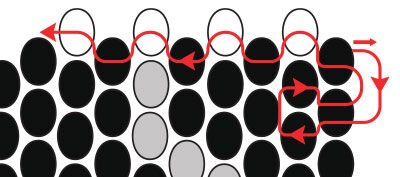
Step 5
Pick up the first bead of the Row 3 then pass through the next bead of the previous row. Continue to add all the beads of Row 3.
Repeat to add all the rows of the pattern. The head pin can be removed at any point after Row 3.
Step 6
Pass back through the bead directly under the last bead added, then the bead below and in.
Pass through the bead directly over the last, then the exit the first bead. Pass back through the last bead picked up.
Step 7
Add four beads using the peyote stitch.
Perform a turn around and pass back through the last bead picked up.
Add three beads using the peyote stitch.
Turn around and pass back through the next “up” bead.
Add two beads using peyote stitch.
Turn around and pass back through the next “up” bead.
Add one bead using peyote stitch..
Step 8
Pass through one hole of the clasp, pick up a bead then pass back through the clasp. Pull gently to close the loop. Pass through twice more to secure.
Step 9
Pass through various beads to exit the last edge bead on the opposite side of the bracelet.
Step 10
Repeat Steps 6 - 8 to decrease to a second triangle and add the second hole of the clasp.
Pass through various beads to secure the thread, then trim.
Step 11
Remove the stop bead from the thread tail and add a beading needle.
Repeat Steps 6 - 10 to finish the other end of the bracelet.
Step 12
Add a beading needle to an arm-length of thread. Pass through various beads to secure the thread, exiting at a corner of the beading.
Step 13
Pick up two #15 black and one #15 red. Pass back through the second black and the next edge bead. Repeat to add picot edging to both sides of the beading.
Have a question regarding this project? Email Customer Service.
Copyright Permissions
The pieces featured in the Gallery of Designs are copyrighted designs and are provided for inspiration only. We encourage you to substitute different colors, products and techniques to make the design your own.
All works of authorship (articles, videos, tutorials and other creative works) are from the Fire Mountain Gems and Beads® Collection, and permission to copy is granted for non-commercial educational purposes only. All other reproduction requires written permission. For more information, please email copyrightpermission@firemtn.com.