Hat Band and Three-Piece Bracelet Set with Gemstone Beads, Delica® Seed Beads and Leather


Hover over to zoom.
Design Idea K32L
-- Designer --
Jude, Jewelry Artist, Exclusively for Fire Mountain Gems and Beads®
To learn more about Jude Wroblewski, read her jewelry artist success story here.
: : : Materials : : :
Click here to view a full list of materials used in this design.
Please take the creative opportunity to select the products of your choice for this design, offered here at Fire Mountain Gems and Beads. Some materials may not be available or listed.
- Seed bead, Delica®, glass, translucent luminous dusk blue, (DB2054), #11 round
- Seed bead, Delica®, glass, opaque matte avocado, (DB1585), #11 round
- Seed bead, Delica®, glass, translucent matte marigold, (DB1261), #11 round
- Seed bead, Delica®, glass, translucent matte light topaz, (DB0742), #11 round
- Seed bead, Delica®, glass, opaque yellow, (DB0721), #11 round
- Clasp, magnetic, stainless steel, 23.5x7.5mm rectangle with glue-in ends, 5.5x3mm inside diameter
- Clasp, magnetic slide lock, imitation rhodium-plated "pewter" (zinc-based alloy), 21x10mm rectangle with glue-in ends, 8x3mm inside diameter
- Bead, antique silver-plated copper, 7x5mm beaded rondelle
- Cord, leather (dyed), brown, 4mm braided square
- Bead, rhyolite (natural), 6mm round, B grade, Mohs hardness 6-1/2 to 7
- Sheet, leather, black, 9x4-inch rectangle, 0.7-0.8mm thick
- Cord, leather, black, 4mm flat
- Design element, leather (dyed), gold, 9-1/4 x 3-1/2 inch double-sided rectangle
- Cord, deerskin leather (dyed), saddle tan, 2.5-3mm
- Thread, Berkley® FireLine®, gel-spun polyethylene, crystal, 0.15mm diameter 4-fiber braid, 6-pound test
- Crimp cover, silver-plated brass, 4mm round
- Adhesive, E6000® Jewelry and Craft Adhesive, clear
- Cord, Powercord®, elastic, clear, 0.8mm, 8.5 pound test
- Bead, picture jasper (natural), 8mm round, C grade, Mohs hardness 6-1/2 to 7
Instructions
Hat Band Instructions
Hat Band Preparation
Step 1
Cut the following:
- Two 9x1 inch sections of black leather sheet
- Two 2-1/2x1-1/8 inch sections of gold leather
- Three 2-foot lengths of saddle tan deerskin leather cord
- Two arm-length sections of FireLine® thread
Step 2
Prepare a loom with 17 warp threads.
Step 3
Thread a length of FireLine thread onto a loom needle.
Loosely tie the tail to the bar on one side of the loom.
Step 4
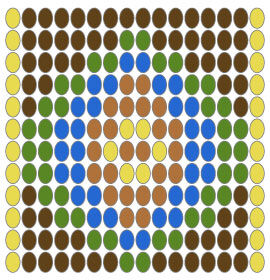
Pick up the beads for the first row of the loom pattern pictured. Pass the needle around the back side of the warp threads. Use your index finger to press the seed beads up. Each bead should sit between each warp thread. Pull the thread through the seed beads, keeping them in place with your finger.
Pass back through the seed beads, in front of the warp threads.
Repeat to loom the pattern 24 times.
Step 5
Pass through the second to last loomed row of beads then through various adjacent beads to secure the thread. Trim excess thread.
Untie the tail from the loom frame then thread on the loom needle. Pass through the second loomed row of beads then through various adjacent beads. Trim excess thread.
Step 6
Remove one warp thread from the loom, keeping the other warp threads tight, then thread through the needle. Secure the thread using the technique described in Step 5.
Repeat to secure each warp thread on both ends.
Hat Band Assembly
Step 7
Thread a leather needle with a length of FireLine thread. Tie a small knot at the end of the working thread, leaving a 10-inch tail.
Pass the needle through a length of black leather at the corner, from the “wrong” to the “right” side. Pull the thread to bring the knot snug to the back of the leather.
Step 8
Hold the leather to the back of the loomed band with your non-dominant hand.
Pass the needle back through the leather, near the edge, and between two edge beads. Pass back through between the next two edge beads, moving over the weft thread, and the leather.
Repeat to stitch the leather to all four edges of the loomed band.
Secure the thread with a small knot at the end of the band. Do not remove the needle or trim the thread.
Step 9
Fold a piece of gold leather in half by bringing the short ends together over the last three rows of the band. Hold the leather in place with your non-dominant hand.
Step 10
Pass the leather needle in through the edge of the gold leather, through the loomed beads and out through the edge of the gold leather on the other side. Repeat four to five times to secure the corner of the leather to the band.
Step 11
Pass through a row of beads covered by the gold leather. Repeat Step 10 to secure the opposite corner.
Secure the thread with a small hidden knot and trim any excess.
Step 12
Thread the leather needle onto the thread tail created in Step 7. Repeat Steps 9 and 11 to add a leather end to the opposite end of the band.
Step 13
Braid the three lengths of deerskin leather in a standard three-strand weave.
Pass the braid through the loops of the gold leather ends and center.
Step 14
Thread a beading needle onto a length of FireLine thread. Add a stop bead to the end of the thread, leaving a 6-inch tail.
Step 15
Pick up eight matte avocado seed beads.
Pick up an avocado seed bead, skip the last seed bead picked up then pass back through the next. Pull the thread so the last seed bead rests on top of the one next to it, beginning the third row.
Repeat to complete the third row with avocado seed beads.
Step 16
Continue to use the even count peyote stitch to add the following colors of seed beads:
- Rows 4 and 5: avocado
- Row 6: color-lined luminous neon teal blue
- Rows 7-10: avocado
- Row 11: teal
- Rows 12-16: avocado
- Row 17: teal
- Rows 18-20: avocado
- Row 21: teal
- Rows 22-26: avocado
- Row 27: teal
- Rows 28-30: avocado
- Row 31: teal
Step 17
Bring the ends of the braided deerskin leather together then wrap the peyote stitch rectangle around then, approximately four inches from the ends.
Step 18
Pass the beading needle through the first bead of the first row then the first bead of the last row. Pull tight to bring the two beads closer together.
Pass through the second bead of the first row then the second bead of the last row. Repeat, pulling slightly tighter each time, to zip the ends together around the braid.
Step 19
Remove the stop bead. Create a small knot with the working thread and the tail.
Pass through various adjacent beads to hide the knot and secure the thread. Trim the excess thread.
Step 20
Unbraid 2 - 3 inches of the braided cord to create a tassel effect.
Bracelet Set Instructions
Stretch Bracelet
Step 1
Cut a 12-inch length of 0.8mm Powercord® elastic cord.
Step 2
String the following onto the cord:
- Ten 8mm picture jasper rounds
- One 7x5mm beaded rondelle
- Seven 6mm rhyolite rounds
- One beaded rondelle
- Ten picture jasper rounds
Step 3
Tie the ends of the cord together using a surgeon's knot. If desired, add a small amount of adhesive for additional security.
Place a crimp cover over the knot.
Braided Bracelets
Step 1
Cut three 12-inch lengths of saddle tan deerskin leather cord and three 12-inch lengths of black 4mm flat leather cord.
Step 2
Apply adhesive in one half of a 23.5x7.5mm magnetic clasp.
Gather the three strands of saddle tan cord together and insert one set of ends into the clasp. Set aside to cure.
Repeat with one half of a 21x10mm magnetic clasp and the three strands of black cord.
Step 3
Braid the saddle tan cords in a standard three-strand weave.
Apply a small amount in the second half of the 23.5x7.5mm clasp and insert the ends of the braided cords. Set aside to cure.
Repeat to complete the black braided bracelet.
Multi-Strand Bracelet
Step 1
Cut one 8-inch length of 4mm braided leather cord and two 8-inch lengths of saddle tan 3mm deerskin leather cord.
Step 2
Apply adhesive in one half of a 21.5x10mm magnetic clasp.
Gather the three strands of cord together and insert one set of ends into the clasp.
Repeat with the second half of the clasp and the opposite ends of the cords then set aside to cure.
Copyright Permissions
The pieces featured in the Gallery of Designs are copyrighted designs and are provided for inspiration only. We encourage you to substitute different colors, products and techniques to make the design your own.
All works of authorship (articles, videos, tutorials and other creative works) are from the Fire Mountain Gems and Beads® Collection, and permission to copy is granted for non-commercial educational purposes only. All other reproduction requires written permission. For more information, please email copyrightpermission@firemtn.com.