Single-Strand Necklace with Crystal Passions® Beads and Wirework


Hover over to zoom.
Design Idea NH2Z
-- Designer --
LauraLynn, Jewelry Designer, Exclusively for Fire Mountain Gems and Beads®
To learn more about LauraLynn, read her jewelry artist success story here.
: : : Materials : : :
Click here to view a full list of materials used in this design.
Please take the creative opportunity to select the products of your choice for this design, offered here at Fire Mountain Gems and Beads. Some materials may not be available or listed.
- Bead, Crystal Passions®, crystal AB, 12mm faceted star (5714)
- Bead, copper, 3x2.5mm rondelle
- Bolo cord, leatherette, black, 3.5-4mm textured round
- Clasp, toggle, copper-plated brass, 16mm round
- Cord coil, glue-in, copper-finished steel, 11x5.5mm with 3.5mm inside diameter
- Head pin, copper, 1 inch with 1.5mm ball, 22 gauge
- Jump ring, copper, 12mm hand-cut round diamond wire, 9.2mm inside diameter, 16 gauge
- Jump ring, copper, 6mm hand-cut round square wire, 4.2mm inside diameter, 19 gauge
- Wire, copper, half-hard, round, 22 gauge
- Wire, copper, half-hard, square, 16 gauge
- Wire, copper, half-hard, square, 18 gauge
- Adhesive, epoxy, Devcon® 2 Ton® Clear Epoxy, 30-minute, 2-part
- Hammer, steel and wood, 10-1/2 inches with 1-1/8 inch textured dual head
Instructions
Step 1

Cut a 6-inch length of square 18-gauge wire.
Make a 90-degree bend approximately 2-inches from the end of the wire. Form the wire into a circle then bend the wire 90 degrees to mirror the first bend.
Step 2
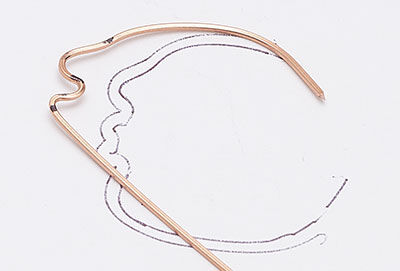
Draw or print a man-in-the-moon shape that fits inside the wire circle.
Cut a 6-inch length of 22-gauge wire.
Working with small adjustments and on the template as much as possible, bend the wire to match the moon shape. Trim any excess wire.
Step 3

Cut a 1-foot length of square 16-gauge wire.
Create a small loop on one end of the wire. Approximately 1/2 an inch down the wire, bend back around the tip of round-nose pliers to create a sun ray. Create curves in the ray as desired.
Continue to bend around the tip of the pliers in reverse directions to create alternating 1/2 inch and 1 inch sun rays.
Create a small loop then trim any excess wire.
Gently bend the line of sun rays to match the curve of the circle component.
Step 4
Hammer the sun rays to flatten and texture.
Step 5
Lay all three pieces on your work surface as they will be put together. If needed, adjust wire to ensure all the pieces fit well and that there is a small space between each sun ray.
Step 6
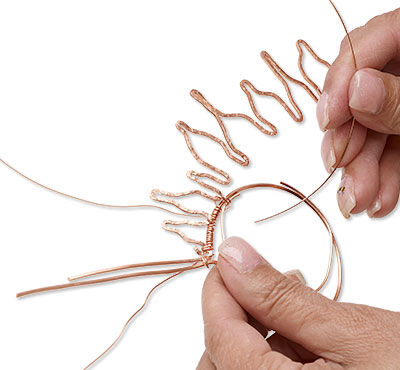
Cut a 3-foot length of 22-gauge wire.
Hold the rays in position so one of the end loops is directly next to the bend of the circle. Use the 28-gauge wire to tightly wrap the loop to the circle. Continue by wrapping along the circle and once between each ray.
As you approach where the moon will be, hold the moon in place and continue to wrap around all three components.
After wrapping the second loop of the rays to the circle, wrap around just the circle twice then trim any excess wire.
Step 7

Bend the "legs" of the circle in a teardrop shape toward the back of the pendant.
Cut a 2-foot length of 22-gauge wire. Tightly wrap the 22-gauge wire around both the bail wires, starting just at the inside edge of the circle. Continue to wrap to the outer edge of the circle, wrap around both the front and back of the bail to secure closed, then continue to wrap along the length of the bail. Trim any excess wrapping wire.
Trim the ends of the bail wires to approximately 1/4 inch then create simple loops.
Step 8
Use alternating (11) 12mm and (10) 6mm jump rings to create a chain. Open the middle 12mm jump ring and attach it to the bail of the pendant.
Step 9
Cut two 7 1/2 inch lengths of bolo cord.
Use adhesive to add a cord coil to each end of both lengths of cord. Set aside to dry.
Step 10
Use 6mm jump rings to attach the bolo cords to each end of the chain.
Use a 6mm jump ring to attach a 12mm jump ring to one end of a bolo cord. Then use another 6mm jump ring to add half of the clasp.
On the end of the opposite bolo cord, add a chain of alternating (3) 6mm and (3) 12mm jump rings. Use a 6mm jump ring to add the second half of the clasp.
Step 11
String a rondelle and a star onto a head pin then create a simple loop. Repeat to create a total of six drops.
Use 6mm jump rings to add a drop to every other 12mm jump ring on each side of the pendant.
Have a question regarding this project? Email Customer Service.
Copyright Permissions
The pieces featured in the Gallery of Designs are copyrighted designs and are provided for inspiration only. We encourage you to substitute different colors, products and techniques to make the design your own.
All works of authorship (articles, videos, tutorials and other creative works) are from the Fire Mountain Gems and Beads® Collection, and permission to copy is granted for non-commercial educational purposes only. All other reproduction requires written permission. For more information, please email copyrightpermission@firemtn.com.