Secrets to Wireworking Video 2: Closed Wire Spirals Earrings with Crystal Passions® Beads and Drops and Wirework


Hover over to zoom.
Design Idea MH23
-- Designer --
Patti, Jewelry Designer, Exclusively for Fire Mountain Gems and Beads®
To learn more about Patti Miller, read her jewelry artist success story here.
: : : Materials : : :
Click here to view a full list of materials used in this design.
Please take the creative opportunity to select the products of your choice for this design, offered here at Fire Mountain Gems and Beads. Some materials may not be available or listed.
- Bead, copper, 3mm bicone
- Bead, Crystal Passions®, tanzanite, 4mm bicone (5328)
- Drop, Crystal Passions®, tanzanite, 17x8.5mm faceted briolette pendant (6010)
- Ear wire, antique copper-plated copper, 18.5mm fishhook with 5x4mm teardrop and open loop, 20 gauge
- Head pin, copper, 1 inch with 1.5mm ball, 22 gauge
- Wire, ParaWire™, copper, round, 20 gauge

Modern materials meet vintage style in the next project of our wirework series. Grab your pliers and follow along with Patti as she teaches you how to form closed wire spirals for an eye-catching element in this whimsical wire and crystal earring project.
Instructions
Step 1
Cut a 12-inch length and a 5-inch length of wire.
Step 2
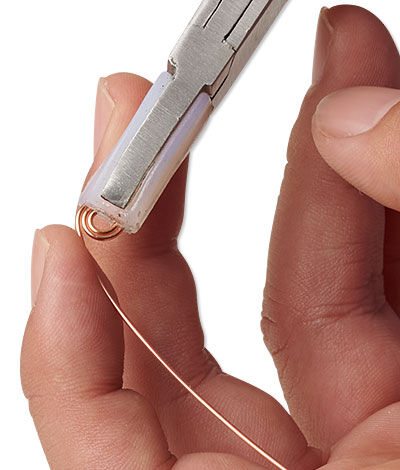
Form a simple loop on one end of the 12-inch length of wire using round-nose pliers. Cut approximately 2mm off the loop with flush-cutter pliers. Clamp the loop with your nylon jaw pliers, pushing wire around the outside of the loop with your fingers. Adjust the grip on the loop as needed.
Step 3
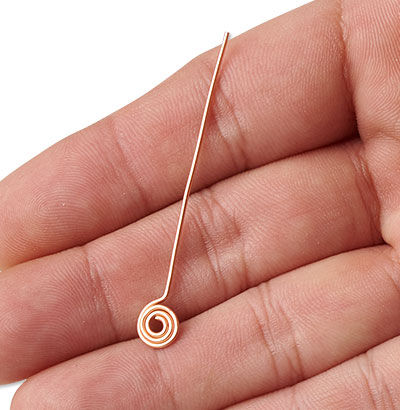
Continue pushing the wire to create a spiral until you've gone around five times. Using the tip of the round-nose pliers, clamp the wire against the spiral and push downward to create a bump.
Note: This is where you will attach the spiral to the ear wire.
Continue to push the wire halfway around the spiral and make a loop using round-nose pliers. Clamp the loop with chain-nose pliers.
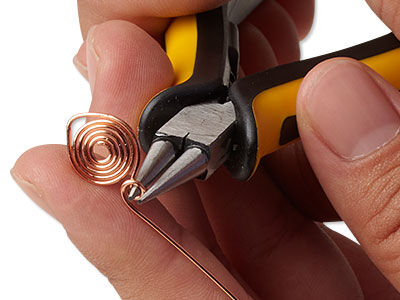
Step 4

Continue to push wire around the second loop four times, clamping the outside of the spiral with nylon jaw pliers as needed. End with a simple loop opposite the bump created in Step 3. Trim any excess wire.
Step 5
Form a simple loop on one end of the 5-inch length of wire using round-nose pliers. Cut approximately 2mm off the loop with flush-cutter pliers. Push the wire around the simple loop three times to create a spiral.
Step 6
Pass a crystal drop onto the wire. Gently bend the tail of the wire up against the drop and form a simple loop. Bend the spiral down against the front of the drop.
Step 7
Pass a crystal bicone onto a head pin and form a simple loop. Repeat to create three dangles.
Pass a copper bicone onto a head pin. Repeat to create a second copper dangle.
Step 8
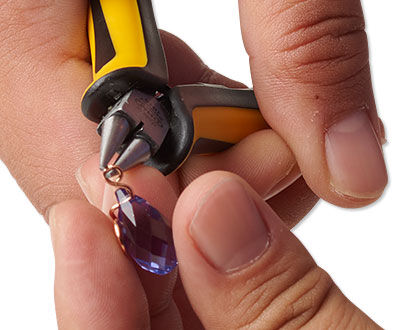
Attach the drop, two dangles and a copper dangle to the simple loop created in Step 6.
Attach a dangle, a copper dangle and the spiral component to an ear wire.
Step 9
Repeat Steps 1 - 8 to create a second earring.
Have a question regarding this project? Email Customer Service.
Copyright Permissions
The pieces featured in the Gallery of Designs are copyrighted designs and are provided for inspiration only. We encourage you to substitute different colors, products and techniques to make the design your own.
All works of authorship (articles, videos, tutorials and other creative works) are from the Fire Mountain Gems and Beads® Collection, and permission to copy is granted for non-commercial educational purposes only. All other reproduction requires written permission. For more information, please email copyrightpermission@firemtn.com.