Key Ring with Delica® Seed Beads and Leather Fringe

Hover over to zoom.
Design Idea L52H
-- Designer --
Rose, Jewelry Designer, Exclusively for Fire Mountain Gems and Beads®
To learn more about Rose Wingenbach, read her jewelry artist success story here.
: : : Materials : : :
Click here to view a full list of materials used in this design.
Please take the creative opportunity to select the products of your choice for this design, offered here at Fire Mountain Gems and Beads. Some materials may not be available or listed.
- Split ring, stainless steel, 32mm round
- Seed bead, Delica®, glass, Duracoat® opaque galvanized pewter, (DBL1852), #8 round
- Seed bead, Delica®, glass, Duracoat® opaque galvanized dark seafoam, (DBL1846), #8 round
- Seed bead, Delica®, glass, Duracoat® opaque galvanized berry, (DBL1838), #8 round
- Seed bead, Delica®, glass, Duracoat® opaque galvanized zest, (DBL1835), #8 round
- Seed bead, Delica®, glass, opaque black, (DBL0010), #8 round
- Needle, loom, Tulip, nickel-plated steel, 0.5mm with 0.68mm needle eye width, 3-1/2 inches
- Component, Realeather®, deerskin leather (dyed), black, 3 x 2-inch fringe with 1/8 inch wide strips
- Adhesive, E6000® Jewelry and Craft Adhesive, clear
- Sheet, leather, black, 9x4-inch rectangle, 0.7-0.8mm thick
- Loom, Clover, plastic / stainless steel / iron / steel / aluminum, purple and light purple, 8-1/2 x 4-1/4 to 11-3/4 x 4-1/4 inches, 2-1/2 inch looming width
- Wonder clip, Clover, stainless steel and plastic, red and clear, 26x10mm
- Thread, Berkley® FireLine®, gel-spun polyethylene, smoke, 0.15mm diameter 4-fiber braid, 6-pound test
Instructions
Key Ring Instructions
Creating the Loom Design
Step 1
Cut the following lengths:
- One 1-1/2 x 5-inch length of leather sheet
- One 4-1/4 x 1-inch length of leather sheet
- One 2-1/4 inch length of leather fringe component
- Two arm-length sections of Fireline® thread
Step 2
Prepare the beading loom with 10 warp threads (one more thread than the number of rows used in the design), spaced approximately 2mm apart.
Step 3
Thread a beading needle, doubling the thread. Pull the thread end to create a tail that is approximately five inches. Loosely tie the tail to the bar on the side of the loom.
Step 4
String nine dark sea foam seed beads.
Pass up the needle around the back side of the warp threads. Use your index finger to press the seed beads up. Each bead should sit between each warp thread. Pull the thread through the seed beads, keeping them in place with your finger.
Pass back through the seed beads, in front of the warp threads.
Step 5
Untie the tail from the loom and tie to the working thread snug to the seed beads to secure.
Step 6
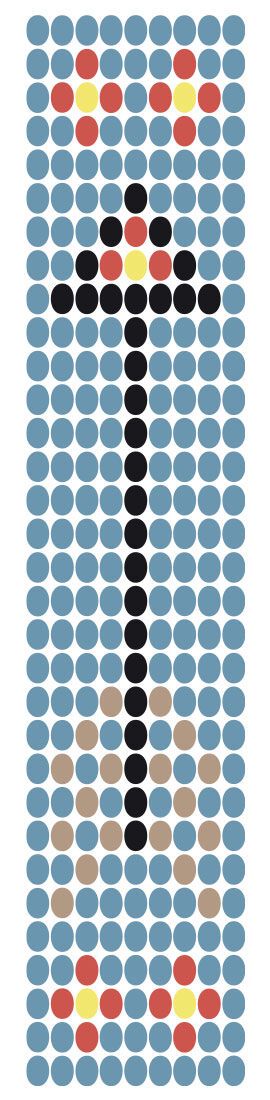
Repeat Step 4 using the following #8 round seed beads:
- Row 2: two dark sea foam, one berry, three dark sea foam, one berry, two dark sea foam
- Row 3: one dark sea foam, one berry, one zest, one berry, one dark sea foam, one berry, one zest, one berry, one dark sea foam
- Row 4: two dark sea foam, one berry, three dark sea foam, one berry, two dark sea foam
- Row 5: nine dark sea foam
- Row 6: one dark sea foam, one pewter, five dark sea foam, one pewter, one dark sea foam
- Row 7: two dark sea foam, one pewter, three dark sea foam, one pewter, two dark sea foam
- Row 8: one dark sea foam, one pewter, one dark sea foam, one pewter, one black, one pewter, one dark sea foam, one pewter, one dark sea foam
- Row 9: two dark sea foam, one pewter, one dark sea foam, one black, one dark sea foam, one pewter, two dark sea foam
- Row 10: one dark sea foam, one pewter, one dark sea foam, one pewter, one black, one pewter, one dark sea foam, one pewter, one dark sea foam
- Row 11: two dark sea foam, one pewter, one dark sea foam, one black, one dark sea foam, one pewter, two dark sea foam
- Row 12: three dark sea foam, one pewter, one black, one pewter, three dark sea foam
- Rows 13 - 23: four dark sea foam, one black, four dark sea foam
- Row 24: one dark sea foam, seven black, one dark sea foam
- Row 25: two dark sea foam, one black, one berry, one zest, one berry, one black, two dark sea foam
- Row 26: three dark sea foam, one black, one berry, one black, three dark sea foam
- Row 27: four dark sea foam, one black, four dark sea foam
- Row 28: nine dark sea foam
- Row 29: two dark sea foam, one berry, three dark sea foam, one berry, two dark sea foam
- Row 30: one dark sea foam, one berry, one zest, one berry, one dark sea foam, one berry, one zest, one berry, one dark sea foam
- Row 31: two dark sea foam, one berry, three dark sea foam, one berry, two dark sea foam
- Row 32: nine dark sea foam
Note: The instructions presented in this step are backwards compared to the Seed Bead Template (PDF) file. Simply reverse the bulleted list above, or flip the image in the file below, to get the correct orientation.
Step 7
Pass through the second to last loomed row of beads then through various adjacent beads to secure the thread. Trim the excess thread.
Untie the tail from the loom from then thread on the loom needle. Pass through the second loomed row of beads then through various beads. Trim excess thread.
Step 8
Remove one warp thread from the loom, keeping the other warp threads tight then thread through the needle. Secure the thread using the technique described in Step 7.
Repeat to secure each warp thread on both sides.
Assembly
Step 9
Fold the 1-1/2 x 5-inch length of leather sheet into thirds, gluing each fold. Let dry.
Fold the leather in half, end-to-end, and through the split ring.
Step 10
Place the loomed design over the 4-1/2 x 1-inch length of leather sheet, sandwiching the loop created in Step 9. Leave the split ring and approximately 1/2 inch of the loop outside the layers.
Step 11
Use the beaded whip stitch to attach the loop design to the 4-1/2 x 1-inch length of leather sheet.
Use the whip stitch to secure the loop.
Step 12
Glue the leather fringe component, end-to-end, to the remaining exposed leather.
Copyright Permissions
The pieces featured in the Gallery of Designs are copyrighted designs and are provided for inspiration only. We encourage you to substitute different colors, products and techniques to make the design your own.
All works of authorship (articles, videos, tutorials and other creative works) are from the Fire Mountain Gems and Beads® Collection, and permission to copy is granted for non-commercial educational purposes only. All other reproduction requires written permission. For more information, please email copyrightpermission@firemtn.com.