Bracelet with Dyna-Mites™ Seed Beads and Enamel and Antique Silver- and Gold-Plated Brass Charms

While the 8-cord kumihimo spiral is a basic braid, the complexity gets kicked up a notch by adding beads in this video tutorial. Learn how to add beads to your kumihimo with these step-by-step instructions.


Hover over to zoom.
Design Idea J72F
Change of Seasons
-- Designer --
Rose, Jewelry Designer, Exclusively for Fire Mountain Gems and Beads®
To learn more about Rose Wingenbach, read her jewelry artist success story here.
: : : Materials : : :
Click here to view a full list of materials used in this design.
Please take the creative opportunity to select the products of your choice for this design, offered here at Fire Mountain Gems and Beads. Some materials may not be available or listed.
- Bead cap, antique gold-plated brass, 11x10mm long filigree, fits 12-14mm bead
- Jump ring, antique gold-plated brass, 8x6mm oval, 5.7x3.6mm inside diameter, 16 gauge
- Charm, enamel and antique silver-plated brass, green, 13x12mm single-sided maple leaf
- Charm, enamel and antique silver-plated brass, brown, 13x12mm single-sided maple leaf
- Head pin, antique gold-plated brass, 3 inches, 21 gauge
- Charm, antique gold-plated brass, 12x12mm double-sided maple leaf
- Bead, antique brass-finished "pewter" (zinc-based alloy), 5x1mm rondelle with dots
- Adhesive, E6000® Fray Lock™, crystal clear
- Seed bead, Dyna-Mites™, glass, silver-lined translucent matte olive green, #6 round with square hole
- Seed bead, Dyna-Mites™, glass, silver-lined translucent matte light gold, #6 round with square hole
- Clasp, toggle, antique gold-plated "pewter" (zinc-based alloy), 14mm round with flower
- Seed bead, Dyna-Mites™, glass, opaque iris bronze, #6 round
- Seed bead, Dyna-Mites™, glass, translucent matte inside color tangerine, #6 round
- Seed bead, Dyna-Mites™, glass, opaque matte brick red, #6 round
- Jump ring, antique gold-plated brass, 5mm round, 3.1mm inside diameter, 19 gauge
- Bead, antique gold-plated brass, 2.5mm corrugated round
- Cord, imitation silk, orange, 1mm
- Thread, Nymo®, nylon, black, size D
Instructions
Step 1
Cut eight 3-foot lengths of imitation silk cord and two 3-inch lengths of nylon thread.
Step 2
Gather the cords together. Place a head pin in the middle of the cords approximately 2 inches from the ends of the cord, with the head pointing away from the ends.
Using a length of nylon thread, tie a whipping knot around the imitation silk cords close to the head of the head pin.
Trim excess cord from around the straight end of the head pin.
Step 3
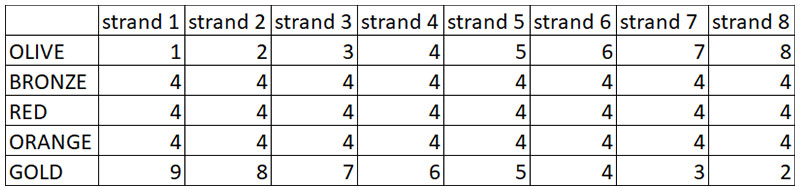
String the following onto the cords:
Cord 1
- One silver-lined matte olive green #6 seed bead
- Four iris bronze #6 seed beads
- Four matte brick red #6 seed beads
- Four matte inside color tangerine #6 seed beads
- Nine silver-lined translucent matte light gold #6 seed beads
Cord 2
- Two green seed beads
- Four bronze seed beads
- Four red seed beads
- Four tangerine seed beads
- Eight light gold seed beads
Cord 3
- Three green seed beads
- Four bronze seed beads
- Four red seed beads
- Four tangerine seed beads
- Seven light gold seed beads
Cord 4
- Four green seed beads
- Four bronze seed beads
- Four red seed beads
- Four tangerine seed beads
- Six light gold seed beads
Cord 5
- Five green seed beads
- Four bronze seed beads
- Four red seed beads
- Four tangerine seed beads
- Five light gold seed beads
Cord 6
- Six green seed beads
- Four bronze seed beads
- Four red seed beads
- Four tangerine seed beads
- Four light gold seed beads
Cord 7
- Seven green seed beads
- Four bronze seed beads
- Four red seed beads
- Four tangerine seed beads
- Three light gold seed beads
Cord 8
- Eight green seed beads
- Four bronze seed beads
- Four red seed beads
- Four tangerine seed beads
- Two light gold seed beads
Note: To reduce tangling while braiding, wrap each beaded cord onto a Huggy Spool®.
Step 4
Insert the knotted end of the cords into the center of a round kumihimo disk. Place the cords according to the spiral kumihimo braid instructions.
Note: View our How to Make a Spiral Kumihimo Braid illustrated instructions for additional details.
Step 5
Braid a standard 8-strand spiral kumihimo braid for 1/4 inch.
Step 6
Continue to use the 8-strand spiral kumihimo braid technique while adding beads until all the beads are used. Slide a bead down into the braid with each cord movement, positioning the bead under the adjacent cord in the center of the disk.
Step 7
Repeat Step 5 for 1/4 inch.
Step 8
Repeat Step 2 to secure the end of the braid.
Step 9
String a filigree cone, a 5x2mm rondelle and a 2.5mm corrugated round onto the headpin at the end of the braid then create a wrapped loop.
Repeat at the opposite end of the braid.
Step 10
Use double 5mm jump rings to connect a wrapped loop and a closed 8x6mm jump ring. Repeat to add a second 8x6mm jump ring.
Use double 5mm jump rings to add the bar half of a toggle clasp.
Step 11
On the opposite end of the bracelet, use double 5mm jump rings to add a closed 8x6mm jump ring. Repeat to add the ring half of a toggle clasp.
Step 12
Use a 5mm jump ring to add a leaf charm to the 8x6mm added in Step 11. Repeat to add a leaf charm to the first 5mm jump ring added. Repeat to add a third link charm to the second 5mm jump ring added.
Have a question regarding this project? Email Customer Service.
Copyright Permissions
All works of authorship (articles, videos, tutorials and other creative works) are from the Fire Mountain Gems and Beads® Collection, and permission to copy is granted for non-commercial educational purposes only. All other reproduction requires written permission. For more information, please email copyrightpermission@firemtn.com.