Bracelet with Seed Beads

Hover over to zoom.
Design Idea J41U
Peyote Stitch Hugs
-- Designer --
Rose, Jewelry Designer, Exclusively for Fire Mountain Gems and Beads®
To learn more about Rose Wingenbach, read her jewelry artist success story here.
: : : Materials : : :
Click here to view a full list of materials used in this design.
Please take the creative opportunity to select the products of your choice for this design, offered here at Fire Mountain Gems and Beads. Some materials may not be available or listed.
- Seed bead, Delica®, glass, Duracoat® opaque galvanized yellow gold, (DB1833), #11 round
- Seed bead, Delica®, glass, opaque carnation pink-dyed white, (DB1371), #11 round
- Seed bead, Delica®, glass, opaque matte rainbow coral, (DB0873), #11 round
- Seed bead, Delica®, glass, opaque matte dyed red, (DB0796), #11 round
- Seed bead, Delica®, glass, opaque vermillion red, (DB0727), #11 round
- Seed bead, Delica®, glass, opaque brick red, (DB0654), #11 round
- Seed bead, Delica®, glass, opaque color-lined luster cotton candy pink, (DB0245), #11 round
- Seed bead, Delica®, glass, opaque color-lined luster baby pink, (DB0234), #11 round
- Clasp, toggle, glass rhinestone and gold-plated brass, clear, 12mm round
- Seed bead, Delica®, glass, transparent luster crystal clear, (DBC0050), #11 cut
- Thread, Berkley® FireLine®, gel-spun polyethylene, crystal, 0.15mm diameter 4-fiber braid, 6-pound test
- Seed bead, Miyuki, glass, translucent pink-lined luster crystal clear, (RR207), #15 rocaille
- Jump ring, gold-plated brass, 4mm round, 2.4mm inside diameter, 20 gauge
Instructions
Step 1
Cut two 6-foot lengths of FireLine® thread.
Thread a beading needle onto one length of thread, almost doubling the thread to make it easier to work with, then string a stop bead, leaving an 18-inch tail.
Step 2
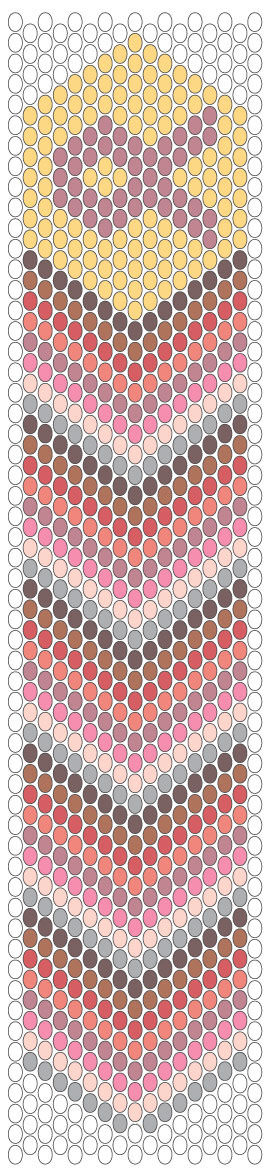
Starting with Row 7, use the pattern provided and the peyote stitch technique to create the main body of the bracelet.
Note: View the ''How to Make a Peyote Stitch'' how-to video and illustrated instructions for additional details.
Step 3
As your needle exits the last full size row of peyote stitch weave into the bead work, turning the needle around back in the direction it came. When the needle is facing the other direction, pass through the last bead strung on in the next to last row then through the last bead of the last row.
Pick up the next bead and pass through the next 'popped up' bead. Continue across the row.
Repeat until you've decreased to the end of the pattern.
Step 4
After the last row of peyote stitch is completed pass back through the beads of the second to last row then exit out the center bead of the last row.
Step 5
Pick up one seed bead and position parallel to the center bead of the last row. Pass through the center bead of the last row and the picked up bead two more times.
Repeat to add four more seed beads to the ladder stitch.
Note: View the ''Ladder Stitch, How-To'' how-to video and illustrated instructions for additional details.
Step 6
Pass through the center bead of the last row and then the last bead added to the ladder stitch twice to create a loop with the added beads.
Step 7
Pass through several adjacent beads to secure the thread. As an option, a knot may be added for additional security.
Step 8
Remove the stop bead and repeat Step 3 to add the tapered end to the opposite end of the bracelet.
Step 9
Repeat Steps 5 - 7 to add a loop to the opposite end of the bracelet.
Step 10
Thread a needle onto the second length of thread. Pass through several beads at one end of the bracelet, exiting through the first edge bead on one side.
For additional security a knot may be added.
Step 11
Pick up three #15 rocailles. Skip over one edge bead, pass in through the next edge then pass out through the next edge bead.
Repeat to add picot stitching down the entire edge of the bracelet.
Step 12
Pass through the bracelet to exit through the first edge bead on the opposite side.
Step 13
Repeat Step 10 to add picot stitching to the second edge of the bracelet.
Step 14
Repeat Step 6 to secure the thread.
Step 15
Add a 4mm jump ring to one half of a toggle clasp. Repeat to add a jump ring to the second half of the clasp.
Step 16
Use a 4mm jump ring to attach the jump ring added in Step 14 to the seed bead loop at one end of the bracelet.
Repeat to add the second half of the toggle clasp to the opposite end of the bracelet.
Have a question regarding this project? Email Customer Service.
Copyright Permissions
The pieces featured in the Gallery of Designs are copyrighted designs and are provided for inspiration only. We encourage you to substitute different colors, products and techniques to make the design your own.
All works of authorship (articles, videos, tutorials and other creative works) are from the Fire Mountain Gems and Beads® Collection, and permission to copy is granted for non-commercial educational purposes only. All other reproduction requires written permission. For more information, please email copyrightpermission@firemtn.com.