How to Create a Flat Chenille Stitch
Embark on your creative journey with seed beads today by delving into the fundamentals of flat chenille stitch. Join Rose and follow along as she guides you through the process in this step-by-step video tutorial.

Instructions
Note: The instructions use size 8 (A beads) and size 11 (B beads). Different sizes, or all the same size bead, can be used to create an alternative look with the same stitch.
Step 1
Cut an arm's length of thread. Add a beading needle and a stop bead to the thread.
Row 1 and 2
Step 2

Pick up:
- Eight A
- One B
- One A
Pick up one B then pass back through the next two A added to Row 1. Repeat to the end of the row, exiting the last A.
Row 3
Step 3
Pick up one B and one A.
Pass back through the next B added to Row 2.
Pick up two A and pass back through the next B. Repeat two more times.
Pass through the last A of Row 1.
Pick up one B and one A then pass back through the next A added to Row 3.
Row 4
Step 4
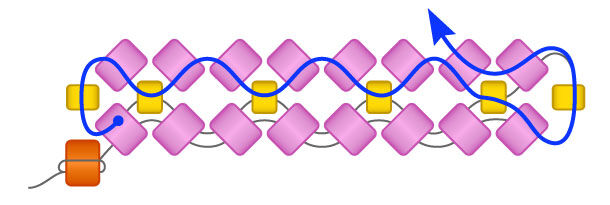
Pick up one B and pass back through the next two A of Row 3. Repeat two more times.
Row 5
Step 5
Pick up two A and pass back through the last B added to Row 4. Repeat two more times.
Pick up two A and pass back through the last two A of Row 3.
Pass up through the second to last A added to Row 5.
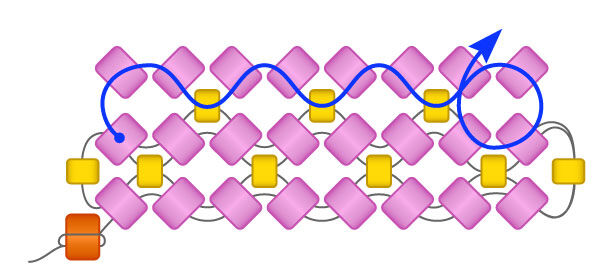
Row 6
Step 6
Pick up one B and pass through the last A of Row 5.
Pick up one B and one A then pass back through the previously added B.
Pass back through the next two A of Row 5 then pick up one B. Repeat three more times.
Step 7
Repeat Steps 3 - 6 until the desired length is reached.
Shop for Your Materials Here:


Have a question regarding this project? Email Customer Service.
Copyright Permissions
All works of authorship (articles, videos, tutorials and other creative works) are from the Fire Mountain Gems and Beads® Collection, and permission to copy is granted for non-commercial educational purposes only. All other reproduction requires written permission. For more information, please email copyrightpermission@firemtn.com.