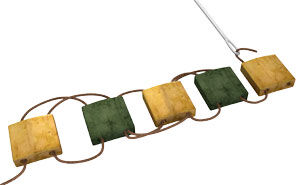
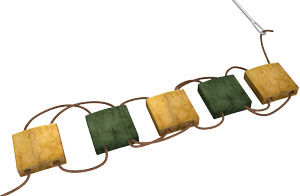
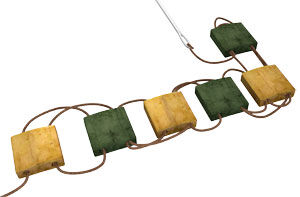
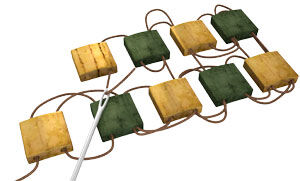
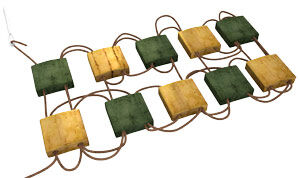
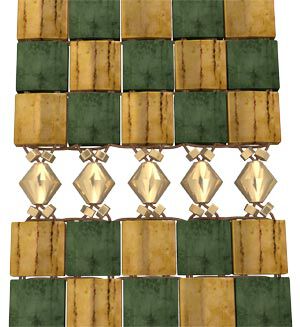
Multi-Strand Bracelet with Tila® Beads, Crystal Passions® Beads and Delica® Seed Beads

Hover over to zoom.
Design Idea BA38
-- Designer --
Esther, Jewelry Designer, Exclusively for Fire Mountain Gems and Beads®
To learn more about Esther Pollock, read her jewelry artist success story here.
: : : Materials : : :
Please take the creative opportunity to select the products of your choice for this design, offered here at Fire Mountain Gems and Beads.

Instructions
Step 1
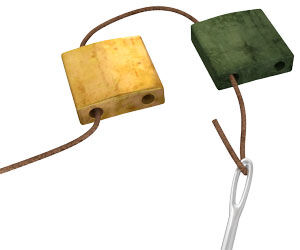
Using a pair of scissors cut a 3-yard length of dark brown Nymo® thread. Add a needle to the thread leaving a 12-inch tail. Because you are working with two-hole Tila beads, begin your first panel with a modified bead ladder from which your following rows will hang. Make a ladder stitch using five Tila beads. Do this by stringing through the bottom hole of two Tila beads then back through the top hole of both Tila beads so that they lay side by side. Come back out the bottom hole of both beads so that you are ready to pick up another Tila bead. Put a Tila bead on your thread going into the bottom hole. Go through the top hole (opposite direction) and through the top hole of the previous Tila bead. Go through the bottom hole of that bead and back out the bottom hole of the bead that was just added. Repeat this until there are a total of five Tila beads in your ladder.
Step 2
Turn your bead ladder around so that the last bead added has the thread coming out the top hole. Add a Tila bead to your thread using the bottom hole. Go back in the top hole of the bottom Tila bead and then back in the bottom hole of the top Tila bead then back out the top hole. Add a Tila bead to your thread using the top hole. Go through the bottom hole of the previous Tila bead in the second row, back in the top hole of the bead from the first row and then go up a row to the bead just added and back through the bottom hole. Now you can add another Tila bead to the second row. Add a Tila bead to your thread through the bottom hole and then in the top hole of the same bead, across to the top hole of the bead beside it. Down through the bottom hole of that bead and through the bottom hole of the bead just added. To secure the new row to the first row, go into the top hole of the bead just below it and then back in the bottom hole of the bead above it (the last bead added). Now add another bead and continue adding two more beads for a total of five beads in the second row.

Step 3
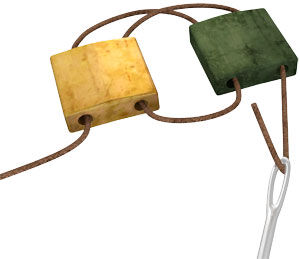
Continue adding rows until you have a total of five rows.
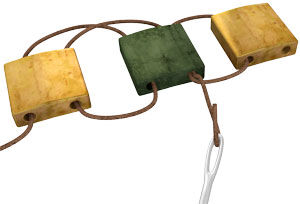
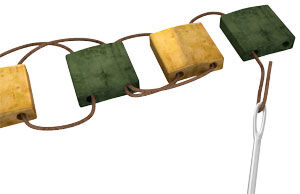
This is the completion of one block. You will need to make a total of six blocks, five beads wide by five rows tall.
Step 4
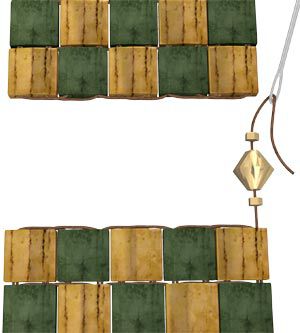
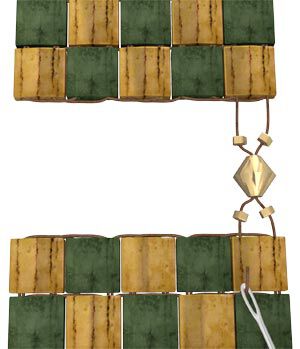
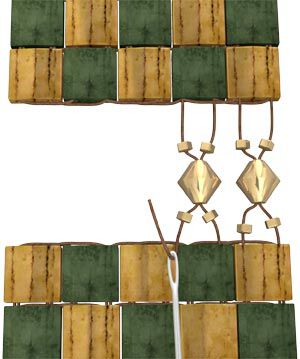
Connecting the blocks together:
Using a pair of scissors cut a 3-yard length of dark brown Nymo thread. Add a needle to the thread. Weave in a figure eight pattern to secure the thread in one of the blocks coming out on an edge. Add one #11 gold-plated seed bead, one Swarovski 4mm bicone aurum crystal bead and one #11 gold-plated seed bead. Put your needle in the top hole of another block, go out the bottom hole of the same bead, add one #11 gold-plated seed bead, go through the existing Swarovski 4mm bicone aurum crystal bead, add one #11 gold-plated seed bead, and go into the second hole of the Tila bead you initially started from. Weave the needle out the top hole of the next Tila bead. Add one #11 gold-plated seed bead; one 4mm Swarovski Crystal; and one #11 seed bead. Go into the top hole of the second bead in your connecting block. To back out the next hole of the same bead, add one #11 gold-plated seed bead and go through the existing crystal and add one #11 gold-plated seed bead into the connecting block. Continue connecting the blocks together in this same manner. After connecting two blocks together weave the string in a figure eight to secure it. Cut the string. Reattach the string on the other side of the block using a figure eight. Then continue connecting the blocks with seed beads and Swarovski 4mm bicone aurum crystal beads in between them.
Step 5
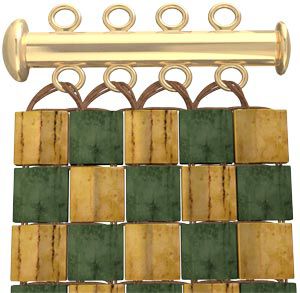
Attaching the clasp:
Using a pair of scissors cut a 2-yard length of dark brown Nymo thread. Add a needle to the thread and weave it into the beads of the end panel in a figure eight to secure it. Hold your clasp to one end of your bracelet. Line up the holes with the loops on the clasp. Go out one hole through the loop of the clasp and back in the next hole. Go out the next bead, through the loop, and down the next closest bead hole. Continue stringing through the clasp, back and forth, until you have secured it. Do this five times. Secure your thread by weaving it in a figure eight through the beadwork and clip the end.
Repeat to attach the clasp to the other side. Leave your clasp closed until you go through a couple of the loops to make sure you are securing the clasp the correct direction. Then you can open the clasp so it is easier to work with.


Copyright Permissions
All works of authorship (articles, videos, tutorials and other creative works) are from the Fire Mountain Gems and Beads® Collection, and permission to copy is granted for non-commercial educational purposes only. All other reproduction requires written permission. For more information, please email copyrightpermission@firemtn.com.