Single-Strand Necklace with Seed Beads and a Pearl

Hover over to zoom.
Design Idea 8934
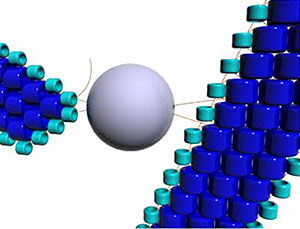
'DNA' Ribbon
Photograph provided by Cath Thomas
-- Designer --
Cath Thomas
To learn more about Cath Thomas, read about her jewelry artist success story here
: : : Materials : : :
Please take the creative opportunity to select the products of your choice for this design, offered here at Fire Mountain Gems and Beads.

Put a twist on the standard brick stitch weave to create a woven twisted ribbon then transform the ribbon into a lariat, finished with a pearl accent.
Instructions
Step 1
Using the scissors, cut a comfortable length of thread (3 feet is a good length to start with). Thread a needle onto the end of thread first off the spool.
Row 1
Step 2
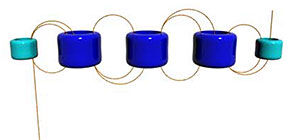
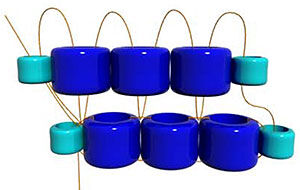
Using the ladder stitch, weave one rocaille (15/0), three Dyna-Mites™ 11/0 seed bead and one rocaille (15/0) for the first row, leaving a 12-inch tail.
Design tip: If you want to change the beads to suit your own preference, maintain the pattern of having the two end beads smaller than the center beads.
Row 2
Step 3
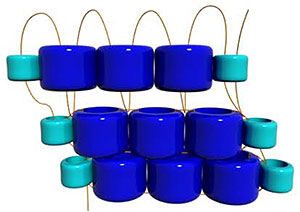
Using the brick stitch, pick up one rocaille and one 11/0 seed bead. Pass the needle under the thread between the end (right side) and middle 11/0 seed beads (skipping the first loop of thread between the rocaille and end 11/0 seed bead) then back up the 11/0 seed bead, with the thread positioned at the top of the second new bead, and ready for the next step.
Pull the thread tightly so the new beads rest against the beads in the previous row.
Good, tight tension is very important when adding each of the rocailles in each row and is what creates the curl of the ribbon.
Pick up one 11/0 seed bead and pass the needle under the thread between the middle and end (left side) 11/0 seed beads in the previous row then back up the new bead so the thread is positioned at the top of the new bead and ready for the next step.
Pull the thread so the new bead rests against the beads in the previous row.
Pick up one 11/0 seed bead then pass the needle under the thread between the end (left side) 11/0 seed bead and the rocaille in the previous row then back up the new bead so the thread is positioned at the top of the new bead and ready for the next step.
Pull the thread so the new bead rests against the beads in the previous row.
Pick up one rocaille and bead then pass the needle under the thread between the 11/0 seed bead on the end and the rocaille in the previous row, then back up the new rocaille bead so the thread is positioned at the top of the new bead and ready for the next step.
Pull the thread so the new bead rests against the beads in the previous row and the tension is tight for that curl.
Note how the beads are offset like a brickwork pattern.
Row 3
Step 4
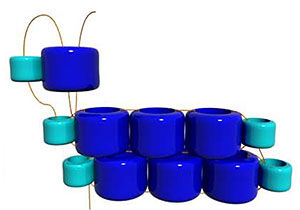
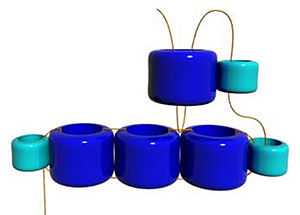
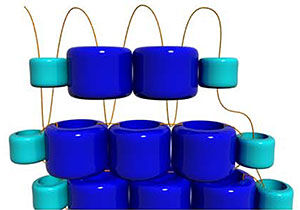
Pick up one rocaille and one Dyna-Mite bead then pass the needle under the loop of thread between the rocaille and the Dyna-Mite of the previous row, back up the second new bead, down the first new bead, back up the second new bead, with the thread positioned at the top of the second new bead, and ready for the next step. Pull the thread tightly so the new beads rest against the beads in the previous row and so the tension is tight.
Pick up one Dyna-Mite bead and pass the needle under the thread between the end and middle Dyna-Mite beads in the previous row then up through the new bead so the thread is positioned at the top of the new bead and ready for the next step.
Pull the thread so the new bead rests against the previous row.
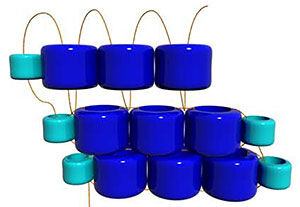
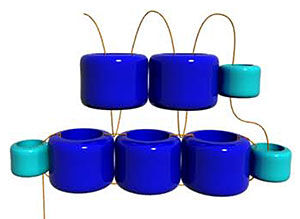
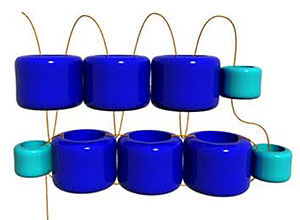
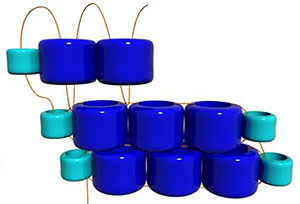
Repeat Steps 3-4 until you reach the desired length.
Decreasing the end and adding the pearl
Step 5
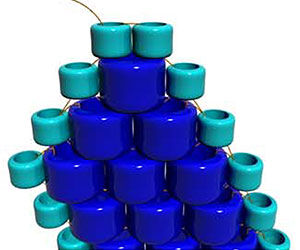
Decrease the end of the brick stitch work by eliminating one Dyna-Mite bead in the pattern for each row. It will take three rows to work down to two rocaille beads on the end.

A

B
C

D

E
F
G
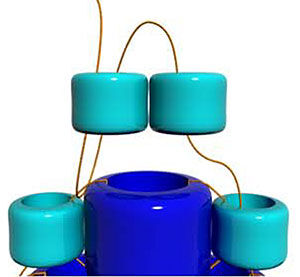
Step 6
Once the end is decreased, thread on the 12mm Swarovski crystal pearl then fold this end onto the ribbon, to cradle the 12mm pearl. Once you've found the spot, weave the thread through the center Dyna-Mite of the designated row, back through the pearl and the rocaille beads on the end, into the beadwork, back out through the rocailles, through the pearl and the center Dyna-Mite bead.
Weave until there is no room left in the beads, then weave the thread into the beadwork, working in a zigzag pattern and in circles, to create a "knot," then trim the excess thread.
Decreasing the other end and adding the pearl
Step 7
Repeat Step 5 to decrease the other end and form a loop.
Step 8
Fold the decreased end onto the ribbon to create a loop large enough to accommodate the 12mm pearl and the beads holding the pearl. Once you've found the spot, weave the thread through the center Dyna-Mite of the designated row, back through the rocailles on the end, into the beadwork, back out through the rocaille beads and through the center Dyna-Mite bead. Weave until there is no room left in the beads, then weave the thread into the beadwork, working in a zigzag pattern and in circles, to create a "knot," then trim the excess thread.
Shop for Your Materials Here:


Have a question regarding this project? Email Customer Service.
Copyright Permissions
The pieces featured in the Gallery of Designs are copyrighted designs and are provided for inspiration only. We encourage you to substitute different colors, products and techniques to make the design your own.
All works of authorship (articles, videos, tutorials and other creative works) are from the Fire Mountain Gems and Beads® Collection, and permission to copy is granted for non-commercial educational purposes only. All other reproduction requires written permission. For more information, please email copyrightpermission@firemtn.com.