Kato Polyclay™ - The Skinner Blend Technique

Presented by Tammy Honaman, Author, Jewelry-Making Expert and Educator, Exclusively for Fire Mountain Gems and Beads®
Named after Judith Skinner, the creator of this technique, the Skinner Blend technique has revolutionized the process of blending colors.
The first few times you practice this technique it is good to choose colors that mix well together: yellow and red will make orange in the middle; yellow and blue will make green in the middle; and any color mixed with white will make a gradient of the same color.
Instructions
Step 1
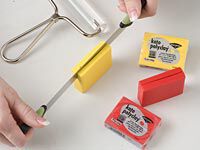
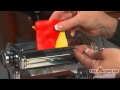
Choose two colors of Kato Polyclay™ and cut a 2-ounce block from each. Please note: hold the super slicer with both hands (as pictured) for safety and stability.
Slice these blocks into thinner slices, so they are close to the thickness of the widest setting on the Poly-Roller™ machine.
Please note: The thickest clay the Poly-Roller can handle coming into the machine is twice the thickness of the sheet coming out of the machine. The first time you pass the clay through, estimate that thickness.
Step 2
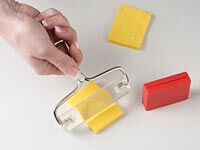
In order to ''wake up'' or condition the clay, and make it more pliable and allow it to fit through the Poly-Roller machine, compress it with an acrylic roller.
Step 3
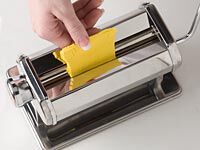
Make sure the Poly-Roller is set on the widest setting possible. Place the clay into the machine and run it through the rollers.
When the sheet comes out of the bottom of the Poly-Roller, fold it in half then, placing the clay fold side first, pass it back through the machine. Repeat this 10 more times.
Rolling the fold side through first will prevent air from being trapped in the clay. If your clay is crumbling and you feel it is too dry, add Kato Polyclay clear medium liquid for moisture.
Step 4
Once your clay is conditioned and in a square-shaped sheet, you can decide what size gradient sheet you want.
- If you are covering a surface such as a light-switch cover, you'll want to use your light switch as a template. Using the Super Slicer blade, cut out the shape from both colors of clay.
- If you are using the gradient in a cane or do not need it to be a certain size, then cut your square sheet of clay any size, just make sure both colors are equal in size and thickness.
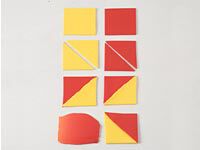
Cut the squares in half diagonally.
Assemble the two different color triangles so they recreate a square.
To create a blended sheet of clay where no version of the original color remains, place the triangles so they meet corner to corner, as seen in the top photo in Step 4. To retain a section of the original colors on either side of the gradient, offset the triangles then trim the points off so the edges of the sheet are flush, as seen in the lower photo of Step 4.
Design tip: If you are making a fixed size gradient, i.e. to cover a light switch cover, keep your two-colored square one sheet of clay in thickness. If you are using the finished gradient sheet for multiple projects and you would like it to be large, layer both halves of each colored square together, keeping like colors together: Yellow to yellow, red to red.
Step 5
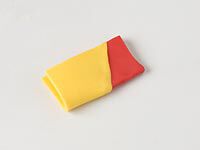
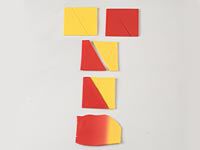
Run the triangle sheet through the poly roller on the thickest setting one time. Fold the sheet in half, yellow to yellow and red to red, then place the folded side on the rollers; as you roll the clay through, the air will be forced out of the clay. Repeat, folding and rolling in the same direction each time until the sheet has reached a gradient level you like. When folding, do not change direction in the middle of the process or you will wind up with MUD!


Have a question regarding this project? Email Customer Service.
Copyright Permissions
All works of authorship (articles, videos, tutorials and other creative works) are from the Fire Mountain Gems and Beads® Collection, and permission to copy is granted for non-commercial educational purposes only. All other reproduction requires written permission. For more information, please email copyrightpermission@firemtn.com.