Multi-Strand Necklace with Enameled Copper Pendant and Crystal Passions® Components

Hover over to zoom.
Design Idea D91U
-- Designer --
Tammy Honaman, Author, Jewelry-Making Expert and Educator, Exclusively for Fire Mountain Gems and Beads®
To learn more about Tammy Honaman, read her jewelry artist success story here.
: : : Materials : : :
Please take the creative opportunity to select the products of your choice for this design, offered here at Fire Mountain Gems and Beads. Some materials may not be available or listed.
- Alundum stone, white, 150 grit, 6x1 inches
- Alundum stone, white, 220 grit, 6x1 inches
- Beginner enamel starter set, Thompson Enamel Vitrearc©, enamel / stainless steel / copper, assorted colors
- Burnisher, wood and stainless steel, curved, 6 inches with 2-inch tip
- Chain, antique copper-plated brass, 3.5mm curb
- Clasp, toggle, antique copper-plated "pewter" (zinc-based alloy), 15x14mm double-sided round
- Cleaner, Penny Brite®
- Component, Crystal Passions®, peridot, 25mm faceted round disk pendant (6039)
- Dapping block, steel and wood, 2x2-inch block with (24) doming punches
- Drill bit, steel, 1-1/4 to 3 inches with 1-4mm twisted bit
- Head pin, copper, 2 inches with 1.5mm ball, 22 gauge
- Jump ring, antique copper-plated brass, 10mm twisted round, 8mm inside diameter, 16 gauge
- Jump ring, antique copper-plated brass, 6mm round, 4.2mm inside diameter, 18 gauge
- Line sifter, steel and rubber, black, 6 inches with 1/32 inch head
- Needle files, carbon steel, 4 inches
- Pliers, wire-wrapping, stainless steel and PVC plastic, black, 6 inches
- Punch, EUROTOOL®, tempered steel, 5 inches with 3mm tip
- Rotary tool, steel, grinding and polishing set with case
- Safety glasses, polycarbonate, for use while firing with kiln and torches
- Shears, Lindstrom®, steel and plastic, black and blue, 5-3/4 inches
- Sheet, copper, half-hard, 6-inch square, 26 gauge
- Torch, Max Flame, steel / plastic / aluminum, black, 6x5 inches
- Tripod with mesh screen, steel, 9 inches tall with (2) 5x5-inch mesh screens
Instructions
Enameled components do not favor high impact, so they do not fare well when put through the stress of a cold connection, like riveting. The glass layer is likely to crack, so it is advisable to find an alternative way to set your enameled designs. Two suggestions are to fully prepare your design prior to enameling or create a setting that doesn't require impact.
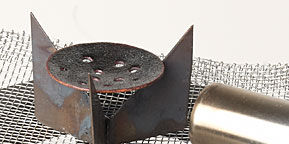
The setting used in the pendant shown is designed to hold the enameled disc in a way where impact and force are not needed. Just a gentle bending and burnishing is all it takes. Use this concept to create designs in any shape and with any pattern or colors.
Pendant Instructions
Step 1
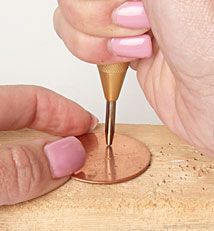
Using a center punch, place divots in the metal blank in a planned or random pattern.
Step 2
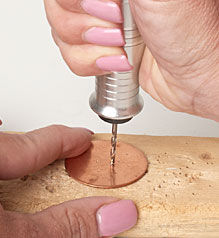
Using the Foredom® flex shaft fitted with a 1 - 2mm drill bit, drill a hole at each divot.
Using progressively larger drill bits, enlarge the holes as your pattern calls for. Using files, remove any burs from the drill holes.
Step 3
Place the disc onto a fire block. Using a torch, heat the disc until it reaches a dark red. You can allow the metal to cool to room temperature on its own or pick it up with fiber grip tweezers and immerse in water.
Note: If possible, dimming your studio lights will help with reading the color of the metal during heating.
Step 4
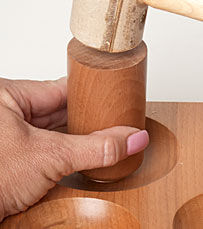
Place the cooled and dried disc into the largest depression in the dapping block. Place the largest punch on top of the disc then strike the end of the punch with a rawhide mallet. Repeat to make sure you strike the disc evenly all around its surface. If you'd like, repeat in the next smaller depression to increase the curve.
Design tip: The curve of the pendant shown was kept shallow. If you desire a steeper curve, you will need to use a metal dapping block and punches as well as use a holding agent when enameling its surface.
Step 5
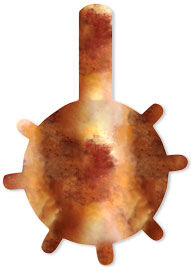
Place the disc onto a sheet of paper. Trace around the shape. Draw a line about 1-2mm out from the shape drawn, enlarging the overall size--the pendant shown was made using a 1-1/2 inch circle. The little bit of extra width will accommodate for the curve added to the metal later. Add points to the drawing where you would like to have your prongs placed. Add a "tail" about 1-3/8 inches long and 1/4 inch wide at the top of the circle, flaring out to about 1/2 inch wide at the top. This extra length will be used to create a bail for the pendant later.
Step 6
Using scissors cut the pattern out. Glue the pattern using repositionable adhesive tape or a low-tack glue, then apply it to the surface of the metal sheet, positioned to create the least amount of waste. Using metal shears or a jeweler's saw, cut the setting from the metal sheet.

Step 7
Using files, sanding pads and polishing points fitted into the flex shaft, clean up the edges of the cutout shape so they are not sharp.
Step 8
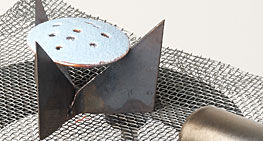
Repeat Step 3 to anneal the metal setting. Repeat Step 4 to shape the setting to suit your design. Put the setting aside.
Step 9
Using a torch or kiln, enamel a counter enamel layer onto the underside of the disc.
Step 10
Using a torch or kiln, fire a top layer of enamel onto the top of the disc.
Step 11
Repeat Step 10 until you reach the desired effect.
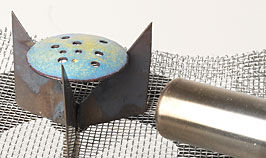
The pendant shown has 4 different layers of color applied--2 of the Daphne blue, a dusting of robin's egg blue and a dusting of butter yellow.
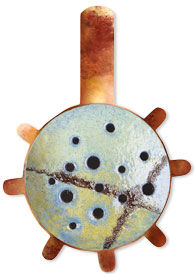
The lines in the finished piece were applied using the line sifter; this layer was done last.
Step 12
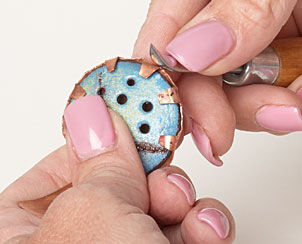
Place the cooled enameled disc into the setting. Gently curve the points toward the face of the enameled disc. Using the burnisher, burnish the edges and the points so they are flush with the surface of the enameled disc.
Step 13
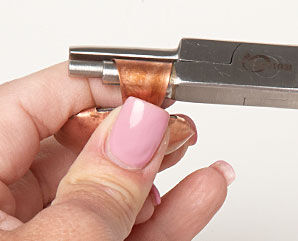
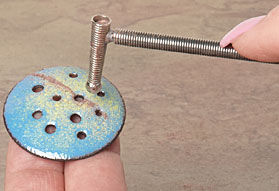
Using the wire-wrapping pliers, roll the tail of metal to form the size bail you would like.
Step 14
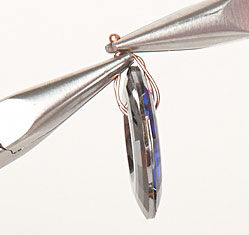
Center, then wrap a headpin around a Swarovski disc component, working from the top then through the opening and back up to the top. Wrap the tail on the straight end under the ball tip to secure the bail.
Repeat for the second disc component.
Step 15
Thread the bails onto different lengths of chain. Use jumprings to gather the chain at each end. Use a jumpring to attach a clasp half to each half of the chain.
Shop for Your Materials Here:


Have a question regarding this project? Email Customer Service.
Copyright Permissions
The pieces featured in the Gallery of Designs are copyrighted designs and are provided for inspiration only. We encourage you to substitute different colors, products and techniques to make the design your own.
All works of authorship (articles, videos, tutorials and other creative works) are from the Fire Mountain Gems and Beads® Collection, and permission to copy is granted for non-commercial educational purposes only. All other reproduction requires written permission. For more information, please email copyrightpermission@firemtn.com.