Glue Crystal Flat Backs with Transfer Sheets

Instructions
It's EASY and can be used for hot-fix flat backs or non-hot-fix flat back crystal rhinestones. Crystal transfer sheets make precision designing and crystal embellishing easy. Because it has one sticky side and one smooth side, you can place your crystals in patterns and they'll stay in place while designing. This project takes about an hour.
Both products are wonderful, but used in different applications.
When do I use hot-fix? I use the hot-fix when embellishing cotton or lightly embellishing here and there, mostly on scarves and apparel. I have been lucky to be born with many talents, but proficiently using the heat application tool and irons are not one of them! Both tools work wonderfully, however the down side is I have burned holes in some nice fabrics applying hot fix. Extra caution should be used with sensitive fabrics like dacron, nylon, rayon, spandex and silk which melt very easily with little heat.
Why do I use Non-Hot-Fix? Really thinking about it, these are my favorite. I can glue to anything, and the specialty fabrics don't give me risk or stress. The results are consistent and wonderful. The glue used depends on the fabric or material being embellished. For leather, vinyl, nylon, tulle, and materials that can be easily damaged with heat, I will use adhesive. Fire Mountain carries a wide variety of glues for rhinestones, referenced in the materials list above. You'll want to experiment with glues to find your favorite. Glue is never wasted around my house. You can also use the glue method on hot-fix rhinestones.
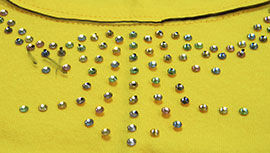
In this project I am using Swarovski flat backs with no hot-fix. I have a small mix of colors called "tenderness" and will add the colors in symmetry as I go. My design will have a basic layout and since it is a casual tank top, and we're just playing, I will ad-lib the design on the fly.
Step 1
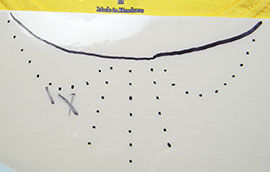
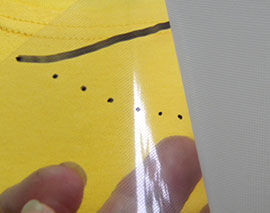
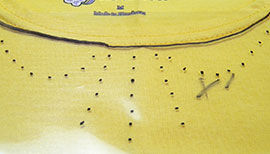
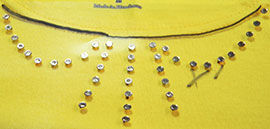
First I will lay my tank top on a flat surface and place the transfer sheet where my design will go and, with a sharpie, trace a recognizable feature--on this it's the tank top's collar. After that I added dots to rough in the approximate spacing I wanted for my crystals. If you have a specific pattern, you could tape it to the transfer paper and make your dots.
Step 2
Now I will take the white backing off the transfer sheet and lay it down adhesive side up on the shirt again. You can tape it down to the fabric if you like. I'll start placing my crystals upside down on the adhesive side of the transfer paper. I work symmetrically so if using multiple colors, I remember the colors for each side.
Step 3
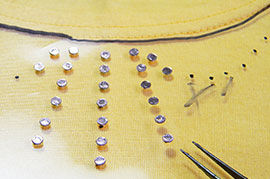
I'll start with the original dot pattern I created, then as I am known to do, ad-lib and add more crystals. You can stop at any time, turn the transfer paper over and check your progress. (Remember to turn over your paper to adhesive side up to add crystals again)
Step 4
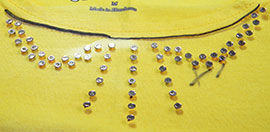
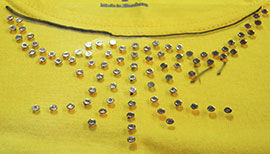
So I have added as much as I wanted to. The selection of colors in this assortment all complement each other so I did not have to worry about color choice too much. Many people will use neutral colors like crystal or jet on garments; it all depends on the end use of the project.
Now here's the difference between using hot-fix and non-hot-fix:
- For Hot-Fix: Turn the paper over and place the glued crystals on the fabric. Watch your orientation and match the collar marking up again. With the transfer paper in place, pre-heat your iron out and iron directly over the transfer paper. Remember to leave the transfer paper in place. The heat will activate the adhesive on the back of the crystals adhering them to the fabric. Use a hot iron with no steam, being careful to move the iron around so you don't burn the fabric. The ironing process usually takes a few minutes. When the fabric is cooled off, slowly lift off the adhesive sheet and the crystals will remain adhered to the fabric. If any do not stay, repeat the ironing process.
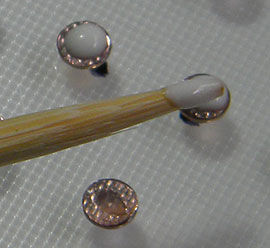
- For Non-Hot-Fix: I take a bamboo skewer and apply a dot of glue to the back of each crystal. It goes quickly. We have a number of glues that are great for fabrics that dry clear, remain flexible and can be washed.
Step 5
Now I will turn the adhesive sheet over and place the glued crystals on the fabric. Watch your orientation and match the collar marking up again. With the transfer sheet in place, I then press all the crystals down gently to make sure the glue and crystal are touching the fabric. Now the glue has to dry. You can put a medium weight book on top of your pattern for a few hours to ensure they stay in contact.
After my glue is dry (waiting a few hours is best) I'll peel the adhesive off and the crystals will stay in place.
Have a question regarding this project? Email Customer Service.
Copyright Permissions
All works of authorship (articles, videos, tutorials and other creative works) are from the Fire Mountain Gems and Beads® Collection, and permission to copy is granted for non-commercial educational purposes only. All other reproduction requires written permission. For more information, please email copyrightpermission@firemtn.com.