Bracelet with Seed Beads, Kumihimo and Antiqued Silver-Finished Brass Link

Hover over to zoom.
Design Idea G101
-- Designer --
Tammy Honaman, Author, Jewelry-Making Expert and Educator, Exclusively for Fire Mountain Gems and Beads®
To learn more about Tammy Honaman, read her jewelry artist success story here.
: : : Materials : : :
Click here to view a full list of materials used in this design.
Please take the creative opportunity to select the products of your choice for this design, offered here at Fire Mountain Gems and Beads. Some materials may not be available or listed.
- Adhesive, G-S Hypo Fabric Cement®
- Clasp, TierraCast®, toggle, antique silver-plated pewter (tin-based alloy), 16.5mm tapered round
- Cone, enamel and stainless steel, black, 15x14mm flower, 8mm inside diameter. Sold individually.
- Huggy Spool®, soft plastic, clear, 2-1/2 inch round with 3/4 inch hole
- Kumihimo disk, EVA foam, white and black, 6-inch round and 3/8 inch thick with 1-1/2 inch inside hole and 32 slots
- Link, antique silver-plated white brass, 14x14mm flower with cutouts
- Scissors, stainless steel and plastic, black, 4-1/2 x 2 inches
- Seed bead, Miyuki, glass, transparent silver-lined cobalt, (LMA19), 7x4mm long magatama
- Seed bead, Miyuki, glass, transparent silver-lined lime green, (LMA14), 7x4mm long magatama
- Thread, Purely Silk™, light green, size F
- Tool, Speedy Stringer™ bowl, wood, 6 x 4-1/2 inches with 1-3/8-inch depth, includes "J" needle
- Wire knitter and kumihimo weight, Artistic Wire®, steel, 3-1/2 x 1/2 inches, 100 grams
- Wire, sterling silver-filled, dead-soft, round, 20 gauge
Instructions
Step 1
Using scissors cut four 1-yard lengths of Purely Silk™ thread.
Using flush-cutters cut one 12-inch length of gold sterling silver-filled 20-gauge wire.
Step 2
Match up the ends of the four lengths of thread. Fold the thread in half and match up the ends creating eight strands then tie an overhand knot.
Step 3
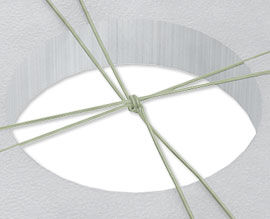
Insert the knotted end into the center of the kumihimo braiding disc then insert the strands into the slots according to the basic spiral kumihimo braid instructions.
Step 4
Pour a mix of Miyuki magatama seed beads into the Speedy Stringer™. Do not fill the bowl more then 2/3 full.
Step 5

Thread the "J" hook needle onto one end of one length of thread and string approximately one foot of magatama seed beads. Place a Bead Stopper™ on the end of the thread to secure the seed beads.
Repeat to string magatama seed beads onto each length of thread.
Tip: Another option is to wind each beaded thread onto a Huggy Spool® bobbin to help avoid tangling.
Step 6
Weave the cord in a basic 8 cord pattern, passing one magatama seed bead down the thread when moving each strand around the kumihimo disc.
Continue to braid the thread until the cord is approximately 6-inches in length.
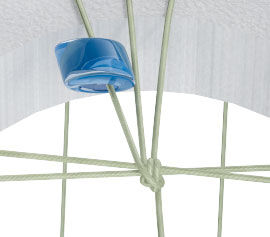
Tip: Attaching a fishing weight is helpful in drawing the braided cord down through the center of the disk.
Note: It may be necessary to add more seed beads as the braid progresses.
Step 7

Remove the ends from the kumihimo disc, tie an overhand knot and apply a small amount of adhesive. Insert the end (approximately 1 inch) of the length of wire through the braided thread. Wrap the wire around itself and the thread 2 - 3 times then trim excess thread. Do not trim the wire.
Step 8
String one flower bead cap onto the end of wire, over the braided thread then begin forming a wrapped loop. String the loop on one portion of the toggle clasp then finish the wrapped loop and trim excess wire.
Repeat using one 14x14mm flower link to secure the opposite end of the bracelet.
Step 9
Use the remaining wire to connect the second portion of the toggle clasp to the opposite side of the flower link, using wrapped loops.
Shop for Your Materials Here:


Have a question regarding this project? Email Customer Service.
Copyright Permissions
All works of authorship (articles, videos, tutorials and other creative works) are from the Fire Mountain Gems and Beads® Collection, and permission to copy is granted for non-commercial educational purposes only. All other reproduction requires written permission. For more information, please email copyrightpermission@firemtn.com.