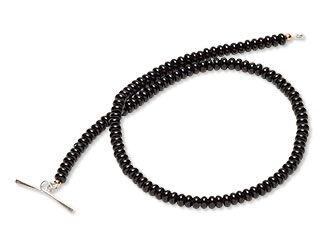
Single-Strand Necklace and Earring Set with Onyx Marble Beads and Sterling Silver Wire


Hover over to zoom.
Design Idea RD3S
-- Designer --
Patti, Jewelry Designer, Exclusively for Fire Mountain Gems and Beads®
To learn more about Patti Miller, read her jewelry artist success story here.
: : : Materials : : :
Click here to view a full list of materials used in this design.
Please take the creative opportunity to select the products of your choice for this design, offered here at Fire Mountain Gems and Beads. Some materials may not be available or listed.
- Bead, black onyx (dyed), 5x2mm rondelle, B grade, Mohs hardness 6-1/2 to 7
- Bead, clear-coated copper, 4mm round
- Beading wire, Accu-Flex®, nylon and stainless steel, pearl, 49 strand, 0.019-inch diameter
- Crimp cover, copper-plated copper, 3mm
- Ear wire, sterling silver, 30mm French hook with 14mm shank, 21 gauge
- Jump ring, clear-coated copper, 8mm round, 5.4mm inside diameter, 16 gauge
- Onyx marble / multi-gemstone / glass, mixed shape drop C grade, mix 16x12mm-40x25mm
- Sterling silver, cut tube crimp, 2mm / 1.3-1.4mm inside diameter
- Wire protector, Accu-Guard™, silver-plated brass, 5mm tube
- Wire, sterling silver, dead-soft, half-round, 24 gauge
- Wire, sterling silver, dead-soft, round, 18 gauge
- Wire, sterling silver, half-hard, round, 16 gauge
Instructions
Necklace Instructions
Step 1
Straighten the wire well before cutting.
Cut:
- One 2.25-inch length of 18-gauge dead-soft round sterling silver wire
- One 2.25-inch length of 16-gauge half-hard round sterling silver wire
- One 3.5-inch length of 16-gauge half-hard round sterling silver wire
- One 4-inch length of 24-gauge dead-soft half-round sterling silver wire
- One 18-inch length of 0.019-inch 49-strand pearl Accu-Flex® professional-quality beading wire
Step 2
Make the bail for the focal by centering the 2.25-inch 18-gauge wire on the center part of the barrel of round-nose pliers , then bending both sides down to form a narrow U-shape. Then remove the pliers.
Pull the tails of the wire gently in opposite directions, curving them up slightly.
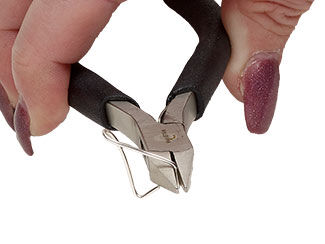
Make the icepick portion of the bail that will go through the gemstone focal by using chain-nose pliers to make a sharp 0.25-inch inward bend in the tips of the tails, then push them together so the tips meet each other at the bottom center of the bail.
Slide one side of the ice pick into one hole of the gemstone focal. Then, keeping tension on the first prong, ease the opposite side of the ice pick into the opposite hole in the gemstone focal.
Use your fingers or pliers to gently make any adjustments necessary so the top of the bail is perpendicular to the gemstone focal and the ice pick is secure. Set aside.
Step 3
Make the bar end of the toggle clasp by centering the 2.25-inch section of 16-gauge half-hard round sterling silver wire on the center of the barrel of your round-nose pliers. Bring both tails up and around the opposite sides of the barrel, so the tails are once again in a straight line, but with a loop in the middle.
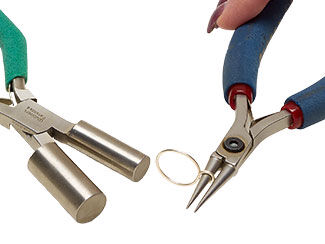
Make the round end of the toggle clasp by using the larger barrel on Wubbers® extra-large round Designer Mandrel pliers to make a loop in the end of the 3.5-inch section of 16-gauge half-hard round sterling silver wire. Leaving the loop to overlap by 0.2-inches, make another loop in the opposite direction from the first loop, using the center of the barrel of round-nose pliers. Cut off the excess tail so the remaining tail of the loop meets the outside of the wire of the large loop.
Place one end of the toggle bar on a steel block so the loop is flat on the block. Use a convex head chasing hammer , to gently flatten the bar, avoiding hitting the loop. Flip the bar over and repeat for the other side of the bar.
Place the toggle loop on a steel block. Flatten the outside three-quarters of the loop slightly, using a convex head chasing hammer, avoiding the overlapping area of wire.
Use a flat file to round out the edges of the bar end of the toggle clasp until they are smooth to the touch.
Line up a set of graduated grit sanding pads , coarsest to finest. Starting with the coarsest pad, sand all the flattened surfaces of both ends of the toggle clasp well, on both sides. Repeat for each grit of sanding pad until you’ve gone through them all.
Tip: Take your time with graduated sanding. The better you sand with each level of grit, the shinier and more scratch free your clasp will be in the end.
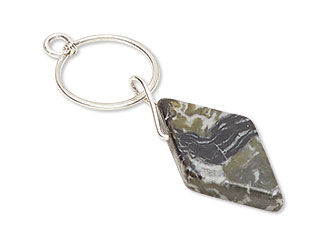
Add the bail of the gemstone focal to the round side of the toggle clasp. Then, wrap the 4-inch length of 24-gauge dead-soft half-round sterling silver wire tightly approximately 5 times around the overlapping wire inside the round end of the toggle clasp. Cut off the excess wire and tuck in the tails. Feel the wire with your fingers. If the ends are sharp, tuck them tighter and use a file to soften the ends until they feel smooth. Use a very small drop of Super Glue® on both ends to secure them.
Step 4
Thread a 2x2mm sterling silver crimp tube, then one end of a 0.5mm silver-plated Accu-Guard™ wire protector onto the 18-inch length of 0.019-inch 49-strand pearl Accu-Flex beading wire.
Thread the loop of the round end of the toggle clasp into the Accu-Guard wire protector, then thread the beading wire through the remaining end of the Accu-Guard. Thread the tail of the beading wire through the crimp tube and pull snugly.
Close the tips of the Accu-Guard together using crimping pliers . Then slide the crimp tube up to the Accu-Guard snugly. Crimp tightly. Then add a 3mm copper crimp cover.
Tip: To leave a good space for the crimp cover to be added when crimping, get your Accu-Guard and crimp tube in place, then, holding the crimping pliers in your dominant hand with the crimping channel snugly against the crimp tube, use the index finger of your non-dominant hand to push the Accu-Guard away, creating about a millimeter space of beading wire before squeezing your crimping pliers.
Thread on 125 black onyx 5x2mm rondelles, then crimp the opposite end as above, adding the loop of the toggle clasp bar end to the Accu-Guard wire protector before crimping.
Pro Tip: Curve your threaded beads in a circle before crimping to achieve the desired drape, without leaving extra space in the Accu-Flex beading wire.
Earring Instructions
Step 1
Cut two 2.25-inch lengths of 18-gauge dead-soft round sterling silver wire.
Step 2
Make the bail for the focal by centering the 2.25-inch 18-gauge wire on the center part of the barrel of round-nose pliers, then bending both sides down to form a narrow U shape. Then remove the pliers.
Pull the tails of the wire gently in opposite directions, curving them up slightly.
Make the icepick portion of the bail that will go through the gemstone focal by using chain-nose pliers to make a sharp 0.25-inch inward bend in the tips of the tails, then push them together so the tips meet each other at the bottom center of the bail.
Slide one side of the ice pick into one hole of the gemstone focal. Then, keeping tension on the first prong, ease the opposite side of the ice pick into the opposite hole in the gemstone focal.
Use your fingers or pliers to gently make any adjustments necessary so the top of the bail is perpendicular to the gemstone focal and the ice pick is secure.
Step 3
Add a 4mm round copper bead to a 30mm sterling silver French hook ear wire. Make a small simple loop tight against the copper bead and cut off the excess wire.
Open an 8mm 16-gauge copper jump ring . Add on the loop of the ear wire and the bail of gemstone focal, orienting it forward.
Step 4
Repeat Steps 1 through 3 for the second earring.


Copyright Permissions
The pieces featured in the Gallery of Designs are copyrighted designs and are provided for inspiration only. We encourage you to substitute different colors, products and techniques to make the design your own.
All works of authorship (articles, videos, tutorials and other creative works) are from the Fire Mountain Gems and Beads® Collection, and permission to copy is granted for non-commercial educational purposes only. All other reproduction requires written permission. For more information, please email copyrightpermission@firemtn.com.