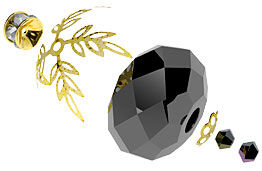
Single-Strand Necklace, Bracelet and Earring Set with Crystal Passions® Beads, Black Onyx Gemstone Beads and Czech Crackle Glass Beads


Hover over to zoom.
Design Idea C64M
Jet Setter
-- Designer --
Gulten Dye
To learn more about Gulten Dye, read her jewelry artist success story here
Instructions by Maura Buckner, Exclusively for Fire Mountain Gems and Beads®
: : : Materials : : :
Click here to view a full list of materials used in this design.
Please take the creative opportunity to select the products of your choice for this design, offered here at Fire Mountain Gems and Beads. Some materials may not be available or listed.
- Bead cap, gold-finished brass, 6x1mm cutout corrugated flower, fits 6-8mm bead
- Bead cap, gold-plated brass, 15x10mm leaf, fits 15-18mm bead
- Bead, black onyx (dyed), 8mm round, A- grade, Mohs hardness 6-1/2 to 7
- Bead, Crystal Passions® and gold-plated brass, crystal AB, 6x3.5mm rondelle (77506)
- Bead, Crystal Passions®, jet AB, 3mm bicone (5328)
- Bead, Czech crackle glass, translucent clear, 17x13mm heart
- Bead, gold-plated brass, 4mm stardust round with 1mm hole
- Beading wire, Accu-Flex®, nylon and stainless steel, clear, 49 strand, 0.019-inch diameter
- Clasp, 2-strand tab, gold-plated brass, 12mm filigree round
- Clasp, lobster claw, gold-plated brass, 18x6mm flat
- Clasp, toggle, gold-plated "pewter" (zinc-based alloy), 10mm twisted round
- Crimp cover, gold-plated brass, 3mm round
- Crimp, gold-plated brass, 2x1.5mm round, 1.3mm inside diameter
- Head pin, gold-plated brass, 2 inches, 24 gauge
- Jump ring, gold-plated brass, 8mm twisted round, 5.8mm inside diameter, 16 gauge
- Seed bead, Preciosa Ornela, Czech glass, opaque metallic gold, #11 round
- Spacer bar, Crystal Passions® and gold-plated brass, crystal AB, 17.5x2.5mm 3-strand, fits up to 4mm bead
- Spacer bar, Crystal Passions® and gold-plated brass, Crystal Passions®, jet with silver-foil back, 17.5x2.5mm 3-strand multi-stone rectangle with 4mm between holes, eight size PP16 chatons
Instructions
Necklace Instructions
Step 1
Open a 3mm crimp cover. Place it over the head on a 2-inch gold-plated headpin. Using chain-nose pliers, gently close the crimp cover.
String one gold-plated 6mm flower bead cap, one jet 18x12mm rondelle, one 15x10mm gold-plated leaf bead cap, one and gold-plated crystal AB 6mm rondelle, one 8mm round black onyx bead, one gold-plated 6mm flower bead cap and one jet AB 3mm bicone onto the headpin. Using a pair of chain-nose pliers, round-nose pliers and flush-cutters, form a wrapped loop on the straight end of the headpin.
Repeat to create a second jet 18mm rondelle wrapped bead drop.
Step 2
Using flush-cutters, cut an 18-inch length of Accu-Flex® professional-quality beading wire. String onto the wire one crimp tube. Pass the wire through the loop on the ring portion of the toggle clasp and back through the crimp tube leaving one end of the wire approximately one inch long. Pull the crimp tight against the loop on the clasp. Place a small amount of adhesive inside the crimp (optional).
Using the crimping pliers, crimp the crimp tube. Using flush-cutters, trim the excess wire from the short end.
Place a crimp cover over the crimp tube then gently close it.
Step 3
String onto the beading wire the following:
- Two jet 3mm bicones
- Five sets of one gold-plated 6mm flower bead cap, one 8mm round black onyx bead, one gold-plated 6mm flower bead cap and one jet 3mm bicone
- One jet 3mm bicone
- Three sets of one 18x13mm clear heart glass bead, one gold-plated 6mm flower bead cap (toward heart bead) and two jet AB 3mm bicone
- One gold-plated 6mm bead cap, one 8mm round black onyx bead, one 6mm multi-crystal rondelle, one gold-plated leaf bead cap, one 18x12mm faceted rondelle jet crystal, one gold-plated 6mm bead cap and two jet 3mm bicones
- Three sets of one 18x13mm clear heart glass bead, one gold-plated 6mm flower bead cap (toward heart bead) and two jet AB 3mm bicone
- One jet AB 3mm bicone
- One gold-plated 6mm flower bead cap, one 8mm round black onyx bead, one and gold-plated crystal AB 6mm rondelle, one gold-plated leaf bead cap, one jet 18x12mm rondelle and two gold-plated 6mm flower bead caps (back to back to create an oval)
- Three metallic gold seed beads
- Two jet AB 3mm bicones
- Five sets of one gold-plated 6mm flower bead cap, one 8mm round black onyx bead, one gold-plated 6mm flower bead cap and one jet AB 3mm bicone
- One jet AB 3mm bicone
- One 18x13mm clear heart glass bead and one gold-plated 6mm flower bead cap (toward heart bead)
Step 4
Place one crimp tube onto the beading wire after the bead cap. Pass the beading wire through the loop on a jet 18x12mm rondelle wrapped bead drop and back through the crimp, then pull the wire snuggly so the crimp is closer to the headpin. Make sure there is no slack along the length of the first part of the necklace. Place a small amount of gel adhesive inside the crimp (optional).
Using the crimping pliers, crimp the crimp tube. Using flush-cutters, trim excess wire from the end.
Place a crimp cover over the crimp tube then gently close it.
Step 5
Repeat Step 2 to attach an 18-inch length of beading wire to the loop on a lobster claw clasp.
Step 6
String onto the beading wire the following:
- Two jet AB 3mm bicones
- Seven sets of one gold-plated 6mm flower bead cap, one 8mm round black onyx bead, one gold-plated 6mm flower bead cap and one jet AB 3mm bicone
- One gold-plated 6mm flower bead cap
- One jet AB 3mm bicone
- One set of one gold-plated 6mm flower bead cap, one 8mm round black onyx bead, one gold-plated 6mm flower bead cap and one jet AB 3mm bicone
- One gold-plated 6mm flower bead cap
- One jet AB 3mm bicone
- Ten sets of one gold-plated 6mm flower bead cap, one 8mm round black onyx bead, one gold-plated 6mm flower bead cap and one jet AB 3mm bicone
- Two jet AB 3mm bicones
Pass the wire through the gold-plated 6mm flower bead cap, the 8mm round black onyx bead, the and gold-plated crystal AB 6mm rondelle, the gold-plated leaf bead cap, the jet 18x12mm rondelle and the two gold-plated 6mm flower bead caps (back to back to create an oval) under the second set of heart beads from the first strand created in Step 4.
Separate the strand back out and continue to string on the following:
- Three metallic gold seed beads
- Two jet AB 3mm bicones
- Five sets of one gold-plated 6mm flower bead cap, one 8mm round black onyx bead, one gold-plated 6mm flower bead cap and one jet AB 3mm bicone
- One jet AB 3mm bicone
- One 18x13mm clear heart glass bead and one gold-plated 6mm flower bead cap (toward heart bead)
Step 7
Repeat Step 4 to attach the end of the beading wire to the second jet 18x12mm rondelle wrapped bead drop.
Bracelet Instructions
Step 1
String one gold-plated 6mm flower bead cap, one jet 18x12mm rondelle, one gold-plated 15x10mm leaf bead cap, one and gold-plated crystal AB 6mm rondelle, one 8mm round black onyx bead and one gold-plated 6mm flower bead cap onto a 2-inch gold-plated headpin. Using a pair of chain-nose pliers, round-nose pliers and flush-cutters, form a wrapped loop on the straight end of the headpin.
Step 2
Using flush-cutters, cut a 12-inch length of Accu-Flex beading wire. String onto the wire one crimp tube. Pass the wire through the first loop on the tab portion of the box clasp and back through the crimp tube leaving one end of the wire approximately one inch long. Pull the crimp tight against the loop on the clasp. Place a small amount of gel adhesive inside the crimp (optional).
Step 3
String onto the beading wire the following:
- Two jet AB 3mm bicones
- Five sets of one gold-plated 6mm flower bead cap, one 8mm round black onyx bead, one gold-plated 6mm flower bead cap and one jet AB 3mm bicone
- One jet AB 3mm bicone, one gold-plated 4mm round stardust and one jet AB 3mm bicone
- The first hole on one jet spacer bead
- One 3mm bicone jet crystal, one gold-plated 4mm round stardust and one 3mm bicone jet crystal
- The first hole on one gold-plated and crystal AB spacer bar
- One jet AB 3mm bicone, one gold-plated 4mm round stardust and one jet AB 3mm bicone
- The first hole on one gold-plated and jet spacer bar
- One jet AB 3mm bicone
- Two sets of one gold-plated 6mm flower bead cap, one 8mm round black onyx bead, one gold-plated 6mm flower bead cap and one jet AB 3mm bicone
- The first hole on one gold-plated and jet spacer bar
- One jet AB 3mm bicone, one gold-plated 4mm round stardust and one jet AB 3mm bicone
- The first hole on one gold-plated and crystal AB spacer bar
- One jet AB 3mm bicone, one gold-plated 4mm round stardust and one jet AB 3mm bicone
- The first hole on one gold-plated and jet spacer bar
- One jet AB 3mm bicone
- One gold-plated 4mm round stardust
- Two jet AB 3mm bicones
- Three sets of one gold-plated 6mm flower bead cap, one 8mm round black onyx bead, one gold-plated 6mm flower bead cap and one jet AB 3mm bicone
- Two sets of one gold-plated 6mm flower bead cap, one 8mm round black onyx bead and one gold-plated 6mm flower bead cap
- Two jet AB 3mm bicones
Step 4
Place one crimp tube onto the beading wire after the bead. Pass the beading wire through the first loop on the filigree round portion of the box clasp and back through crimp then pull the wire snuggly so the crimp is closer to the clasp. Make sure there is no slack along the length of the first part of the bracelet. Place a small amount of gel adhesive inside the crimp (optional).
Step 5
Repeat Step 2 to attach a 12-inch length of beading wire to the second loop on the tab portion of the box clasp.
Step 6
String onto the beading wire the following:
- Two jet AB 3mm bicones
- Five sets of one gold-plated 6mm flower bead cap, one 8mm round black onyx bead, one gold-plated 6mm flower bead cap and one jet AB 3mm bicone
- One jet AB 3mm bicone, one gold-plated 4mm round stardust and one jet AB 3mm bicone
- The second hole on the gold-plated and jet spacer bar
- One jet AB 3mm bicone, one gold-plated 4mm round stardust and one jet AB 3mm bicone
- The second hole on the gold-plated and crystal AB spacer bar
- One jet AB 3mm bicone, one gold-plated 4mm round stardust and one jet AB 3mm bicone
- The second hole on the gold-plated and jet spacer bar
- Two jet AB 3mm bicones
- One gold-plated 6mm flower bead cap (toward heart point), one 18x13mm heart glass bead and two jet AB 3mm bicones
- The second hole on the gold-plated and jet spacer bar
- One jet AB 3mm bicone, one gold-plated 4mm round stardust and one jet AB 3mm bicone
- The second hole on the gold-plated and crystal AB spacer bar
- One jet AB 3mm bicone, one gold-plated 4mm round stardust and one jet AB 3mm bicone
- The second hole on the gold-plated and jet spacer bar
- One jet AB 3mm bicones
- One gold-plated 4mm round stardust
- Two jet AB 3mm bicones
- Five sets of one gold-plated 6mm flower bead cap, one 8mm round black onyx bead, one gold-plated 6mm flower bead cap and one jet AB 3mm bicone
- One jet AB 3mm bicone
Step 7
Repeat Step 4 to attach the end of the beading wire to the second loop on the filigree round portion of the box clasp.
Step 8
Using a pair of chain-nose pliers and flat-nose pliers, open an 8mm twisted round jumpring. Pass it over the last two jet AB 3mm bicones on the second strand and through the loop on the jet 18x12mm rondelle wrapped bead drop. Close the jumpring.
Earring Instructions
Step 1
Open a gold-plated 3mm crimp cover. Place it over the head on a gold-plated 2-inch headpin. Using chain-nose pliers, gently close the crimp cover.
String one gold-plated 6mm flower bead cap, one jet 18x12mm rondelle, one gold-plated 15x10mm leaf bead cap, one gold-plated and crystal AB 6mm rondelle, one 8mm round black onyx bead, one gold-plated 6mm flower bead cap and one jet AB 3mm bicone onto the headpin. Using a pair of chain-nose pliers, round-nose pliers and flush-cutters, form a wrapped loop on the straight end of the headpin to create a bead drop. Repeat to create a total of two bead drops.
Step 2
Using a pair of chain-nose pliers and flat-nose pliers, open the loop on an earwire. Pass it through the loop on the jet 18x12mm rondelle wrapped bead drop. Close the jumpring.
Repeat to create the second earring.


Copyright Permissions
All works of authorship (articles, videos, tutorials and other creative works) are from the Fire Mountain Gems and Beads® Collection, and permission to copy is granted for non-commercial educational purposes only. All other reproduction requires written permission. For more information, please email copyrightpermission@firemtn.com.