Set of Two Bracelets with Crystal Passions® Beads

Hover over to zoom.
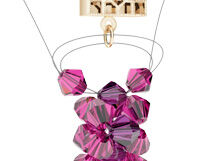
Design Idea C618
Kismet Bracelet
-- Designer --
Tom, Exclusively for Fire Mountain Gems and Beads®
To learn more about Tom Triplett, read his jewelry artist success story here
: : : Materials : : :
Click here to view a full list of materials used in this design.
Please take the creative opportunity to select the products of your choice for this design, offered here at Fire Mountain Gems and Beads. Some materials may not be available or listed.
- Bead, Crystal Passions®, Indian pink AB2X, 4mm bicone (5328)
- Bead, Crystal Passions®, tanzanite, 4mm bicone (5328)
- Clasp, toggle, antique gold-finished "pewter" (zinc-based alloy), 12x12mm double-sided heart
Instructions
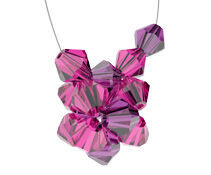
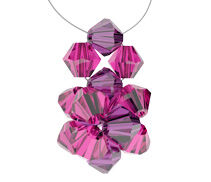
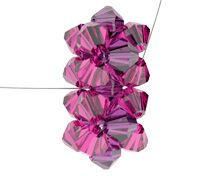
This original design takes the traditional Right-Angle Weave stitch in a different direction to create a chain of semi-round beaded beads.
Step 1

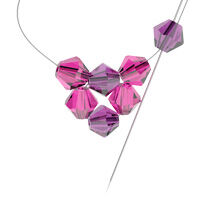
Cut 2 yards of FireLine® thread. Thread a Wide Eye Needle™ onto each end. Thread on 4 beads, alternating the colors, starting with the "A" bead color. Slide the beads to the center of the thread.
Step 2

Hold one needle in each hand, then with the left hand needle, sew back through the first bead threaded, creating a loop with the four beads.
Step 3

Tighten the loop by holding one needle in each hand and pulling on both sides. Center the beads on the thread again by pulling the entire loop to the center.
Step 4
Add a "B" color then add "A" color to the right thread. Add a "B" color to the left thread. Pass the needle on the left thread through the "A" bead.

Hold a needle in each hand then pull to tighten.
Step 5

Add one "B" color to each side.

Thread the right needle through the 1st "A" bead strung, working from right to left. Thread the left needle through the same "A" bead working from left to right.

Tighten up the thread to form the first round bead in the chain.
Tip: Throughout the rest of the project it is important to keep each end of the thread separated and to either side of the project.
Step 6
Add a "B" and an "A" bead to the right thread, and a "B" bead to the left thread.

With the left thread, sew back through the "A" bead just added.
Tip: When this step is completed, the right thread goes to the left side and the left thread goes to the right of the project. This will continue each time you sew back through a bead.
Repeat Step 6 two times.
Step 7
Add a "B" bead to each side (no "A" bead this time).
Count back four "A" beads. (This is the joiner bead, the bead that joins the two beaded beads together.)
Step 8

Sew the left thread back through the joiner bead.

Pull each thread at the same time to tighten and create the next beaded bead.
Step 9
Using the right thread, sew up through the "B" bead right above the thread. Then cross through the "A" bead.
Step 10
Using the thread on the left, sew up through the "B" bead just above the thread then cross through the "A" bead. Pull on both threads at the same time to tighten.
Step 11

On each side, sew down through the "B" bead just above the threads. Then sew on each side back through the next "A" bead. This will become the next joiner bead.
Step 12
Repeat Steps 6 - 11 until you reach the desired length.
Step 13
At the last joiner bead, add one bead on each thread. It does not matter which color. Thread through the loop of one half of the clasp, then down through the next bead. Then cross through the joiner bead and back up through the beads going to the clasp.
Step 14
Cross the threads through the loop of the clasp again, and then back down through the beads on either side. Cross through the joiner bead again. This should form a triangle going to the clasp.
Step 15
Thread through the loop of the clasp, then down through the next bead. Make a surgeon's knot, add a drop of G-S Hypo cement glue to the knot and then thread through one more bead.
Let the glue dry, then cut the threads as close to the last bead as possible.
Step 16

Cut another length of FireLine thread about 1-1/2 feet long and thread a needle onto both sides. On the unfinished end of the bracelet, sew one side of the thread through the "A" bead on the very end.
Add one bead to each end, using the same color beads used for the last two beads on the other end. Cross the threads through the loop of the other half of the clasp. Repeat Steps 13 - 15 to finish attaching the clasp to this end of the design.
Shop for Your Materials Here:


Copyright Permissions
All works of authorship (articles, videos, tutorials and other creative works) are from the Fire Mountain Gems and Beads® Collection, and permission to copy is granted for non-commercial educational purposes only. All other reproduction requires written permission. For more information, please email copyrightpermission@firemtn.com.