Three Techniques for Fusing Glass Frit

Glass fusing is a jewelry-making technique where pieces of glass are melted together at high temperatures to form a single, fused piece. This gives artists the ability to design their own patterns, textures and color blends to create one-of-a-kind design.
There are several ways to fuse glass at home. The most straightforward way is with a glass fusing kiln, but there are other methods as well, which will be explored in this article. But first—safety matters. Always use glass with the same coefficient of expansion (COE) to prevent cracking during firing. Wear eye protection , use a mask to avoid inhaling fine particles and carefully follow all safety guidelines for your chosen heating method.
Fusing Glass Frit in a Kiln
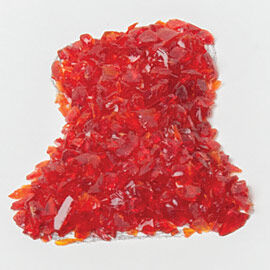
Glass frit is a staple in glass fusing, offering endless creative possibilities for jewelry makers. Used to add color, texture and detail, frit comes in sizes from fine powder to chunky grains and can be layered, sprinkled or fused into base glass. It’s perfect for creating painterly effects and gradients or filling molds for custom components. When fused in a kiln, frit melts and blends into the design, helping transform simple glass pieces into richly detailed, one-of-a-kind jewelry elements.
Instructions
Step 1
Prepare a kiln shelf with either glass separator, kiln wash or by placing a piece of fiber paper onto the surface.
If you like, you can sketch a design onto the kiln paper to help in shaping the frit for fusing.
Tip: Cut the fiber paper to just a bit larger than the shape of the glass, as the fiber paper will shrink during firing. Wear a dust mask when removing the glass from the fiber paper after firing, as it will be dust like.
Step 2
Put on a dusk mask and safety glasses. Pour the glass frit onto the prepared kiln shelf and maneuver the glass into shape.
Step 3
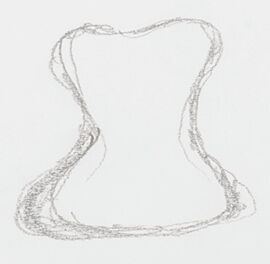
Place the kiln shelf into the kiln. Program the controller to fire the kiln to your fusing schedule. The kiln paper will disintegrate or degrade in firing. This is normal. Note the difference in size from the fused piece to a copy of the original sketched design.
Tip: Each kiln fires differently, so it is recommended to test your kiln to establish the correct temperature, hold times and annealing times before embarking on a finished design.
General fusing temperatures and hold times:
- Ramp up to 1000 degrees Fahrenheit, then hold for 15 minutes.
- Ramp at full speed to 1470 degrees Fahrenheit, then hold for 15 minutes (can vary depending on dimension of frit design).
- Ramp down to 960 degrees Fahrenheit and hold for 120 minutes.
- Ramp down to 700 degrees Fahrenheit and hold for 30 minutes.
- Allow kiln to come to room temperature.
- Do not open the kiln until the temperature is below 100 degrees Fahrenheit.
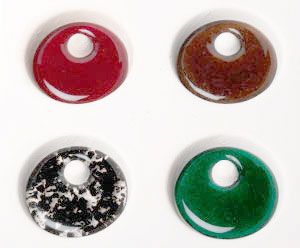
Fusing Glass Frit in a Slumping Mold—Instructions
Fusing glass frit in a slumping mold is a creative technique that allows you to form beautifully textured and dimensional glass pieces. This method involves layering frit—small granules or crushed pieces of glass—into a mold and firing it in a kiln until the frit fuses together and takes on the shape of the mold. The following instructions will guide you through the process, from preparing your materials to firing and finishing your piece safely and successfully.
Step 1
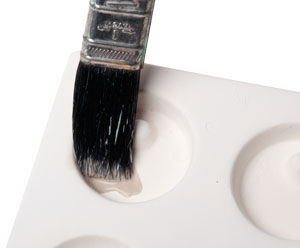
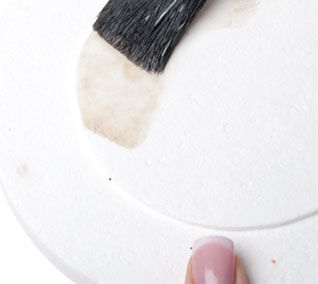
Following manufacturer's instructions, create kiln wash using glass separator or kiln wash. Using a 1-inch brush, apply 3 to 4 layers of kiln wash to the mold, covering the entire depression.
Tip: Allow the kiln wash to dry completely between layers and make sure the last layer is completely dry before using.
Step 2
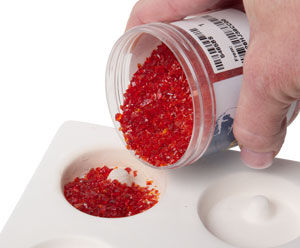
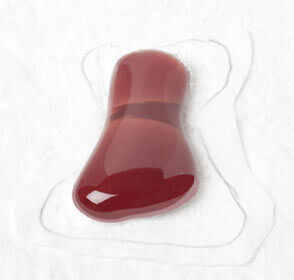
Pour frit into the depression in the mold, filling it to the top.
Step 3
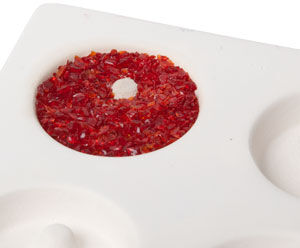
If the design has a “bump” in the mold for creating a hole in the fused design, be sure to leave the area clear.
Place the mold onto ceramic posts or a kiln shelf, inside the kiln. Set the controller for a full fusing.
The schedule used for the pieces shown is:
- Ramp 1 – 900°F/hour to 1000°F. Hold for one minute.
- Ramp 2 – Full speed to 1480°F. Hold for 15 minutes.
- Ramp 3 – Full speed to 1100°F. No hold necessary.
- Ramp 4 – 300°F/hour to 955°F. Hold for 15 minutes.
- Allow the kiln to cool to room temperature, or no higher than 100°F, before opening and removing the mold. Adjust the schedule based on your results.
Fusing Glass in a Microwave Kiln
You can use a microwave kiln when fusing small pieces of glass. Glass is typically 0.125 to 0.25 inches thick, and no more than two pieces of either thickness should be stacked in a microwave kiln. Follow the manufacturer's instructions included with the kiln for usage and safety information.
An easy way to start is to use a Fusework™ fusing glass starter kit , which includes a small microwave kiln, gloves, glass and a few findings.
Safety Tips:
- Using a dedicated microwave for your glass fusing kiln projects is important for both safety and equipment longevity. Glass fusing can release fumes or fine particles that may contaminate the interior of the microwave, making it unsafe for food use. Additionally, the high, sustained heat required during firing can strain or damage the microwave’s components over time. A dedicated unit ensures consistent performance, prevents cross-contamination and provides a safer, more controlled environment for your creative projects.
- You should never fuse glass directly in a standard microwave because it cannot reach the high temperatures (around 1400°F–1500°F) required to properly melt glass. Attempting to do so can damage the microwave, release harmful fumes or even pose a fire risk. Proper glass fusing requires a microwave kiln designed to safely contain and focus the heat.
Instructions
Step 1
Following manufacturer's instructions, create kiln wash using kiln wash or glass separator provided with the microwave kiln. Using a 1-inch brush, apply 3 to 4 layers of kiln wash to the base of the microwave kiln following manufacturer's instructions. Allow the kiln wash to dry completely between layers and make sure the last layer is completely dry before using the microwave kiln.
Tip: Alternatively, you can place a piece of fiber paper onto the base of the microwave kiln to act as the release between the kiln and the glass.
Step 2
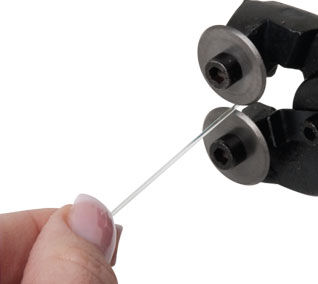
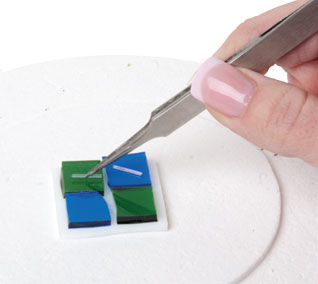
Create a design using glass pieces. Use a glass cutter to alter the shape. Consider adding small pieces of stringers (very thin glass rods). Use glass nippers to cut the stringers into pieces suitable for your design. Wear safety glasses when cutting glass.
Clean all pieces of glass with soap and water. Dry the pieces and only touch them from the ends, so you do not leave any oil on the glass. Traces of oil will cause unwanted changes to the glass in the fusing process.
Step 3
Place the microwave kiln onto three ceramic posts in the center of the microwave. Following manufacturer’s instructions, assemble your design in the center of the base of the kiln.
Tip: Using tweezers helps when placing stringers and shifting the glass pieces into position.
Step 4
Place the cover of the kiln gently onto the base of the kiln, then fuse according to the recommended time in the manufacturer’s instructions, adjusting the power level of your microwave if needed.
Step 5
Place three ceramic posts onto a heat-proof surface. While wearing heat-resistant gloves (found at your local hardware store), remove the microwave kiln from the microwave once you are sure the fuse is complete. Place the microwave kiln onto the three ceramic posts resting on the heat-proof surface. Allow the microwave kiln to rest for 45 minutes undisturbed—no peeking! Once the time is complete and the piece is cooled, remove it and wash it with soap and water.
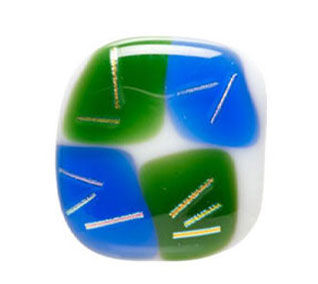
The piece above was fired in the microwave kiln at 50 percent power for 5 minutes. This was done to preheat the glass, as it is more than one layer of glass thick. The microwave was then reset and the microwave kiln fired at 80 percent with a 10 minute cycle. At 5 minutes, fusing was observed, the lid reset and the microwave started again. After 2 more minutes, the fuse was observed again. The fuse was stopped at 8 minutes 45 seconds and the piece allowed to cool for over 1 hour on the ceramic posts on the heatproof surface. Never allow the microwave kiln to cool inside the microwave.
Be sure to take notes on the time and results of each firing. Adjust the power of your microwave if the fuse is not to your liking. Follow the manufacturer's instructions for basic glass cutting, options on fusing times, limits on size of glass to fire in kiln, safety precautions and troubleshooting.

Optional Alternative Design
Have a question regarding this project? Email Customer Service.
Copyright Permissions
All works of authorship (articles, videos, tutorials and other creative works) are from the Fire Mountain Gems and Beads® Collection, and permission to copy is granted for non-commercial educational purposes only. All other reproduction requires written permission. For more information, please email copyrightpermission@firemtn.com.