How to Dye Pearls

Learn how to easily dye pearls to match any outfit or occasion--a process which has been a closely guarded trade secret.
Cultured freshwater pearls are created by mollusks which secrete a coating to protect themselves from the tiny particulate embedded into their body. The coating is known as nacre. Nacre is lustrous, fragile and extremely porous and can be easily stained by body oils and perfumes--and fabric dyes. Due to the dyeable nature of nacre and the availability of fabric dye--it's easy to create your own custom colors of pearls. Just like anything you dye, do a test run before you begin dyeing a full batch of pearls.
Instructions
Choosing your Dye
Choosing a type of dye is a personal preference. You can buy single-step fabric dyes or you can buy two-step artisan fiber-reactive colors that can be mixed and matched for that perfect subtle shade. Other dye options include natural substances such as botanicals or minerals. Natural dyes will produce an artistic hand-created effect; however, it will be challenging to replicate a color due to the nature of organics.
Preparing the Pearls
Soak the pearls in warm water with a small amount of Dawn® dish soap for a few minutes to help remove any wax or surface residue. For a deeper clean, you can boil water separately, remove it from heat, and let it cool slightly. Then briefly dip the pearls into the hot (but not boiling) water for about a minute. Avoid placing pearls in actively boiling water, as excessive heat can damage the delicate nacre coating.
Choosing your Method
Sprinkling Method
This technique gives a beautiful mottled and eclectic spray of different colors.
Step 1
After the pearls have been cleaned, soak them in a warm bath of water.
Step 2
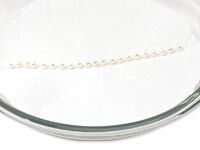
Place a paper towel in the bottom of a glass plate.
Step 3
Place the pearls onto the paper towel (while still wet).
Step 4

Sprinkle the dye powder directly onto the pearls. Let the pearls and dye sit for a while, until dye has taken to the extent you desire.
Dye Bath Method
Prepare your purchased dye according to the manufacturer's directions. Never mix outside chemicals to industrial dyes as this might cause a harmful reaction.
Step 1
Gently pour the dye through a strainer, like a coffee filter, to remove any lumps or undissolved dye powder which, if left, may create specks on your finished pearls.
Step 2
Place a paper towel in the bottom of the glass pan. The paper towel will lift the pearls off the surface of the glass container so they can receive the dye on all sides.
Step 3
Place the pearls onto the paper towel. You can choose to keep them on a strand, just be sure to separate the pearls so they can receive the dye all around the perimeter.

Or, you can choose to place the pearls onto the paper towel loose, just be sure to leave space between the pearls.
Step 4
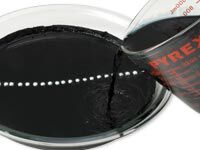
Pour the dye gently into the pan so it doesn't move the pearls. The dye should saturate the fabric or paper towel and rise above the top of the pearls so that they are completely immersed.
The amount of time you let the pearls sit in the dye depends on the intensity of color desired. The longer the pearls remain in the bath increases the intensity of color they will exhibit. To achieve a lighter shade, check your pearls every minute. If you over color your pearls, use a fabric color remover to remove the dye. Re-dye the pearls until they come out just right. When the pearls have reached the color you desire, rinse them thoroughly with water until the water runs clear. Let the pearls dry for at least one day before handling them.
Shop for Your Materials Here:

Have a question regarding this project? Email Customer Service.
Copyright Permissions
The pieces featured in the Gallery of Designs are copyrighted designs and are provided for inspiration only. We encourage you to substitute different colors, products and techniques to make the design your own.
All works of authorship (articles, videos, tutorials and other creative works) are from the Fire Mountain Gems and Beads® Collection, and permission to copy is granted for non-commercial educational purposes only. All other reproduction requires written permission. For more information, please email copyrightpermission@firemtn.com.